> ## Documentation Index
> Fetch the complete documentation index at: https://metoro.io/docs/llms.txt
> Use this file to discover all available pages before exploring further.
# Rootly Integration
## Rootly + Metoro Integration Benefits
* Automatically create incidents in Rootly when Metoro alerts are triggered
* Page on-call responders through Rootly's incident response workflows
* Auto-resolve incidents when alerts recover in Metoro
* Centralize incident management while leveraging Metoro's deep observability
## How it Works
Rootly integration with Metoro works through **webhooks**. When an alert is triggered in Metoro, it sends a webhook notification to Rootly, which can then create an incident and page the appropriate teams. When the alert recovers, Metoro can send a recovery notification to auto-resolve the incident in Rootly.
## Requirements
* A Rootly account with webhook access
* Admin access in Metoro to configure integrations
* A webhook URL and authentication token from Rootly
## Support
If you need help with this integration, please email [support@metoro.io](mailto:support@metoro.io) or join our [Community Slack](https://join.slack.com/t/metorocommunity/shared_invite/zt-2makpjl5j-F0WcpGnPcdc8anbNGcewqw).
## Integration Walkthrough
### Step 1: Create a Webhook in Rootly and Add it to Metoro
Log into your Rootly account and navigate to **Alerts** → **Sources** (or directly go to [https://rootly.com/account/alerts?tab=alert-sources](https://rootly.com/account/alerts?tab=alert-sources))
Search for **Generic Webhook**. Click on **Add source**.
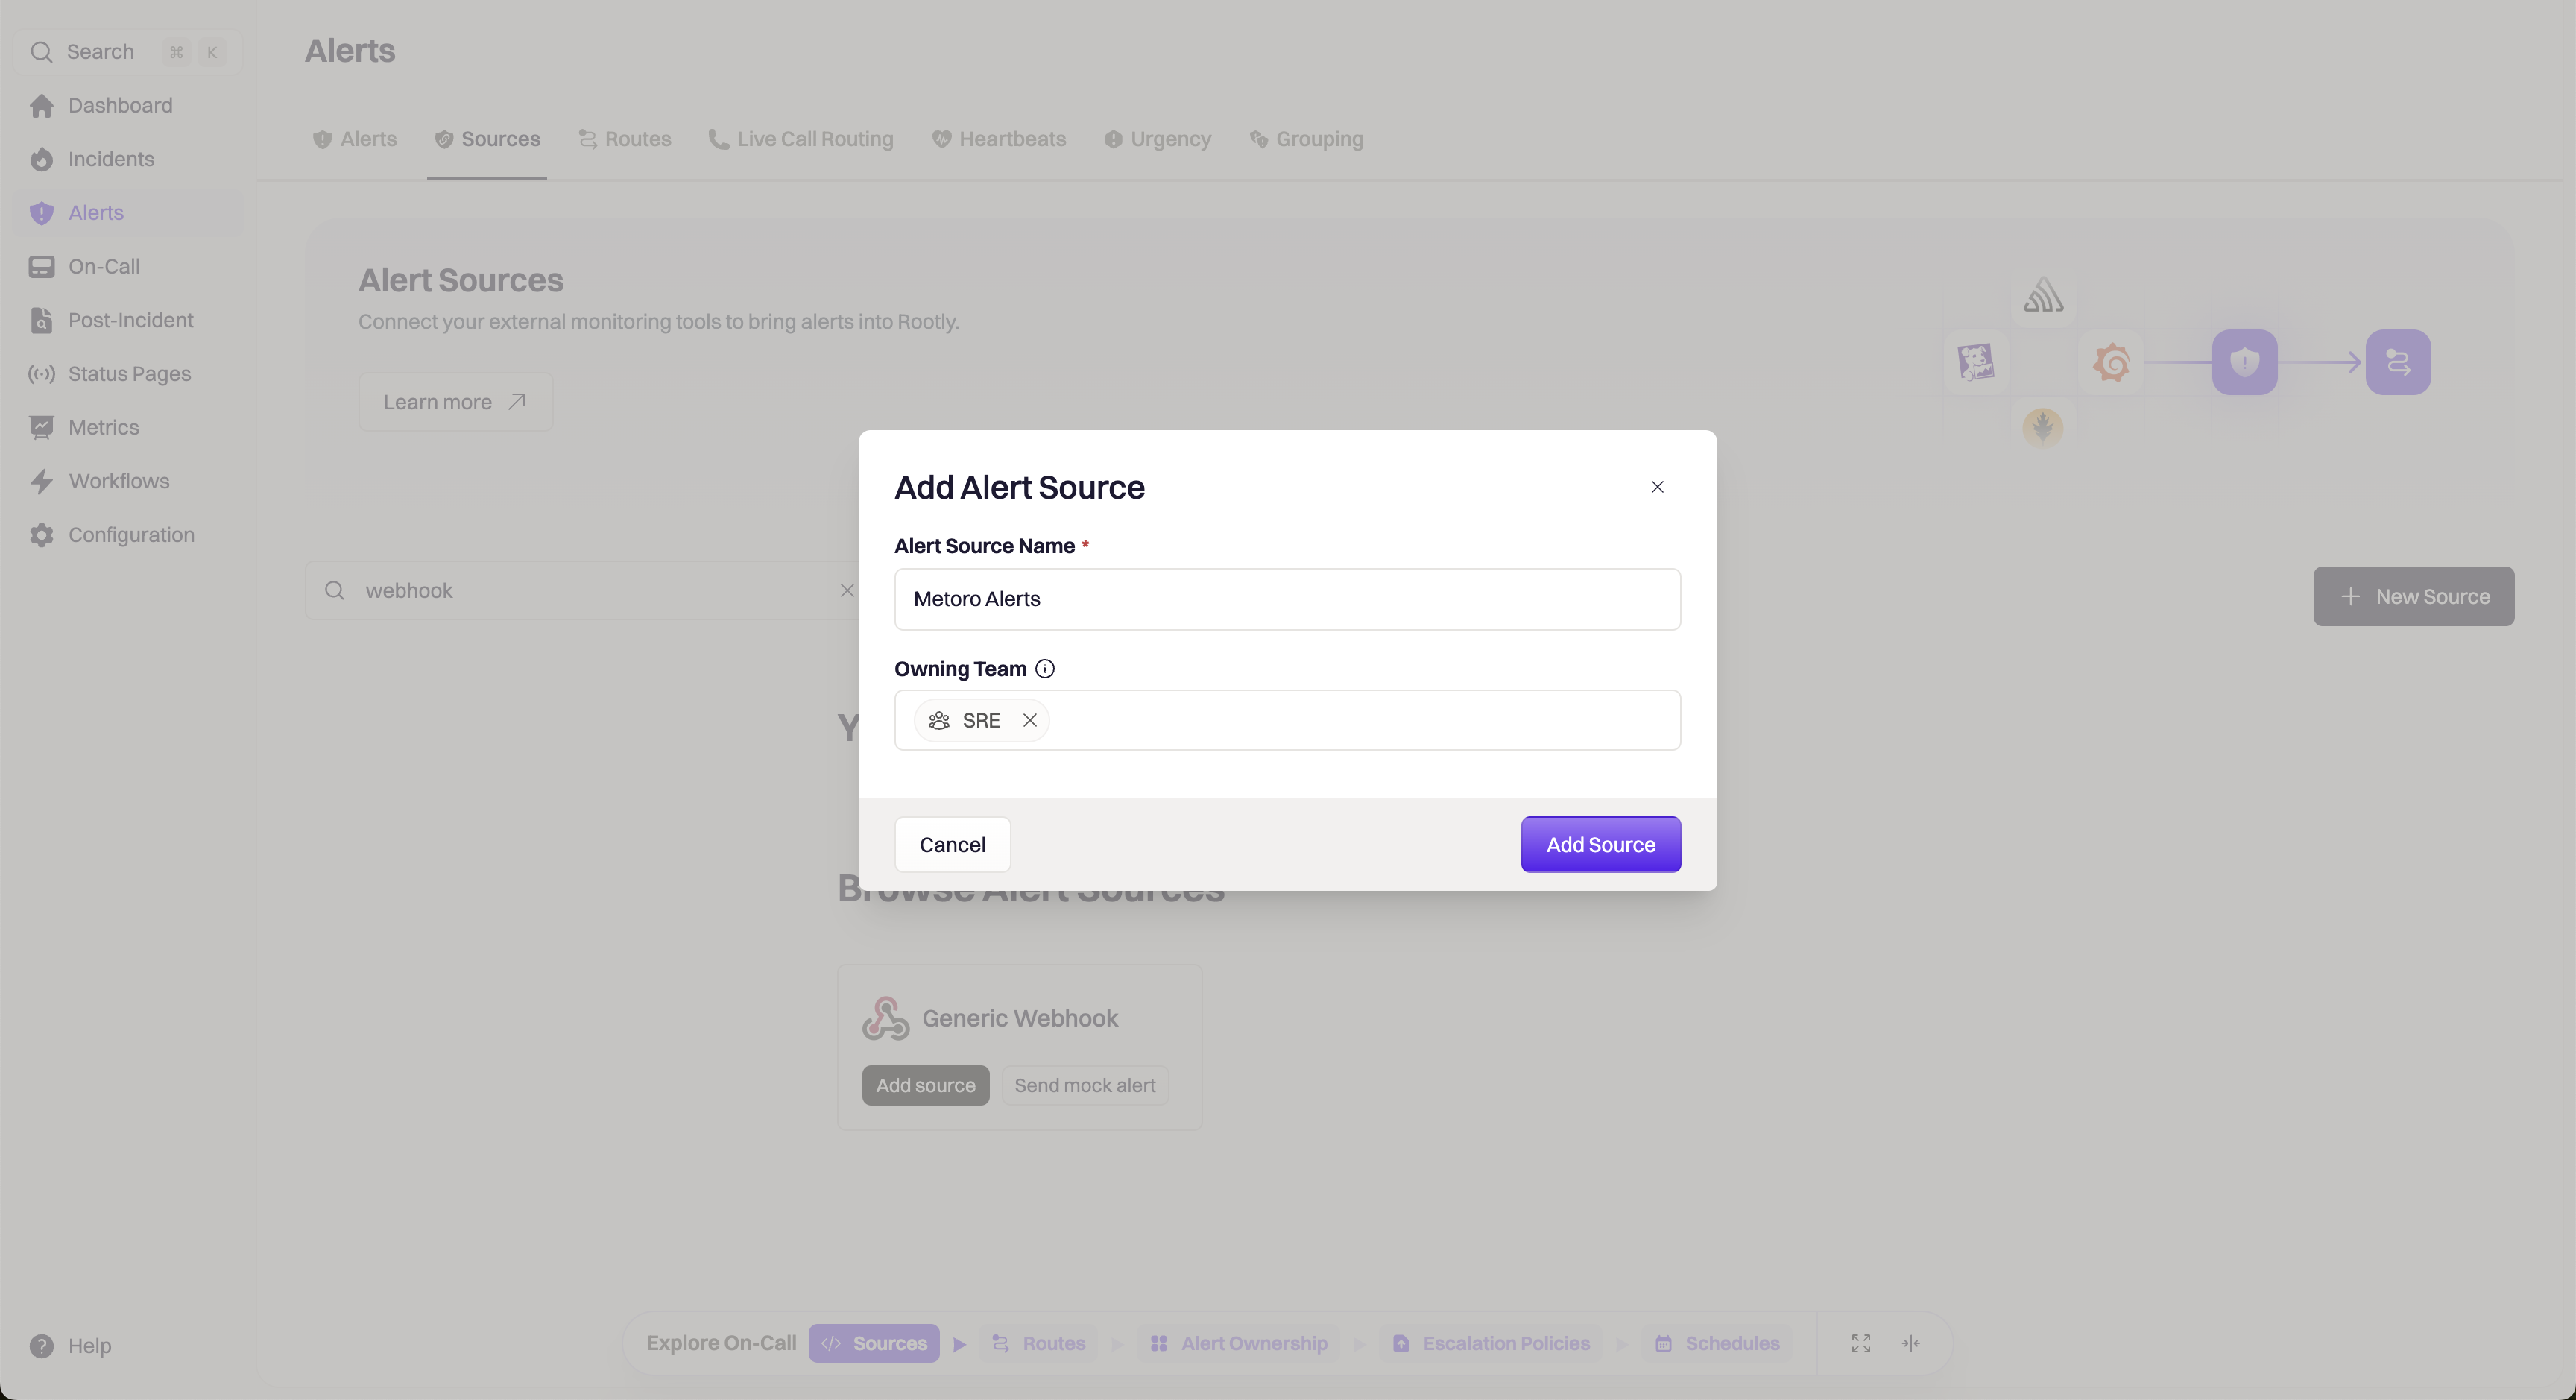
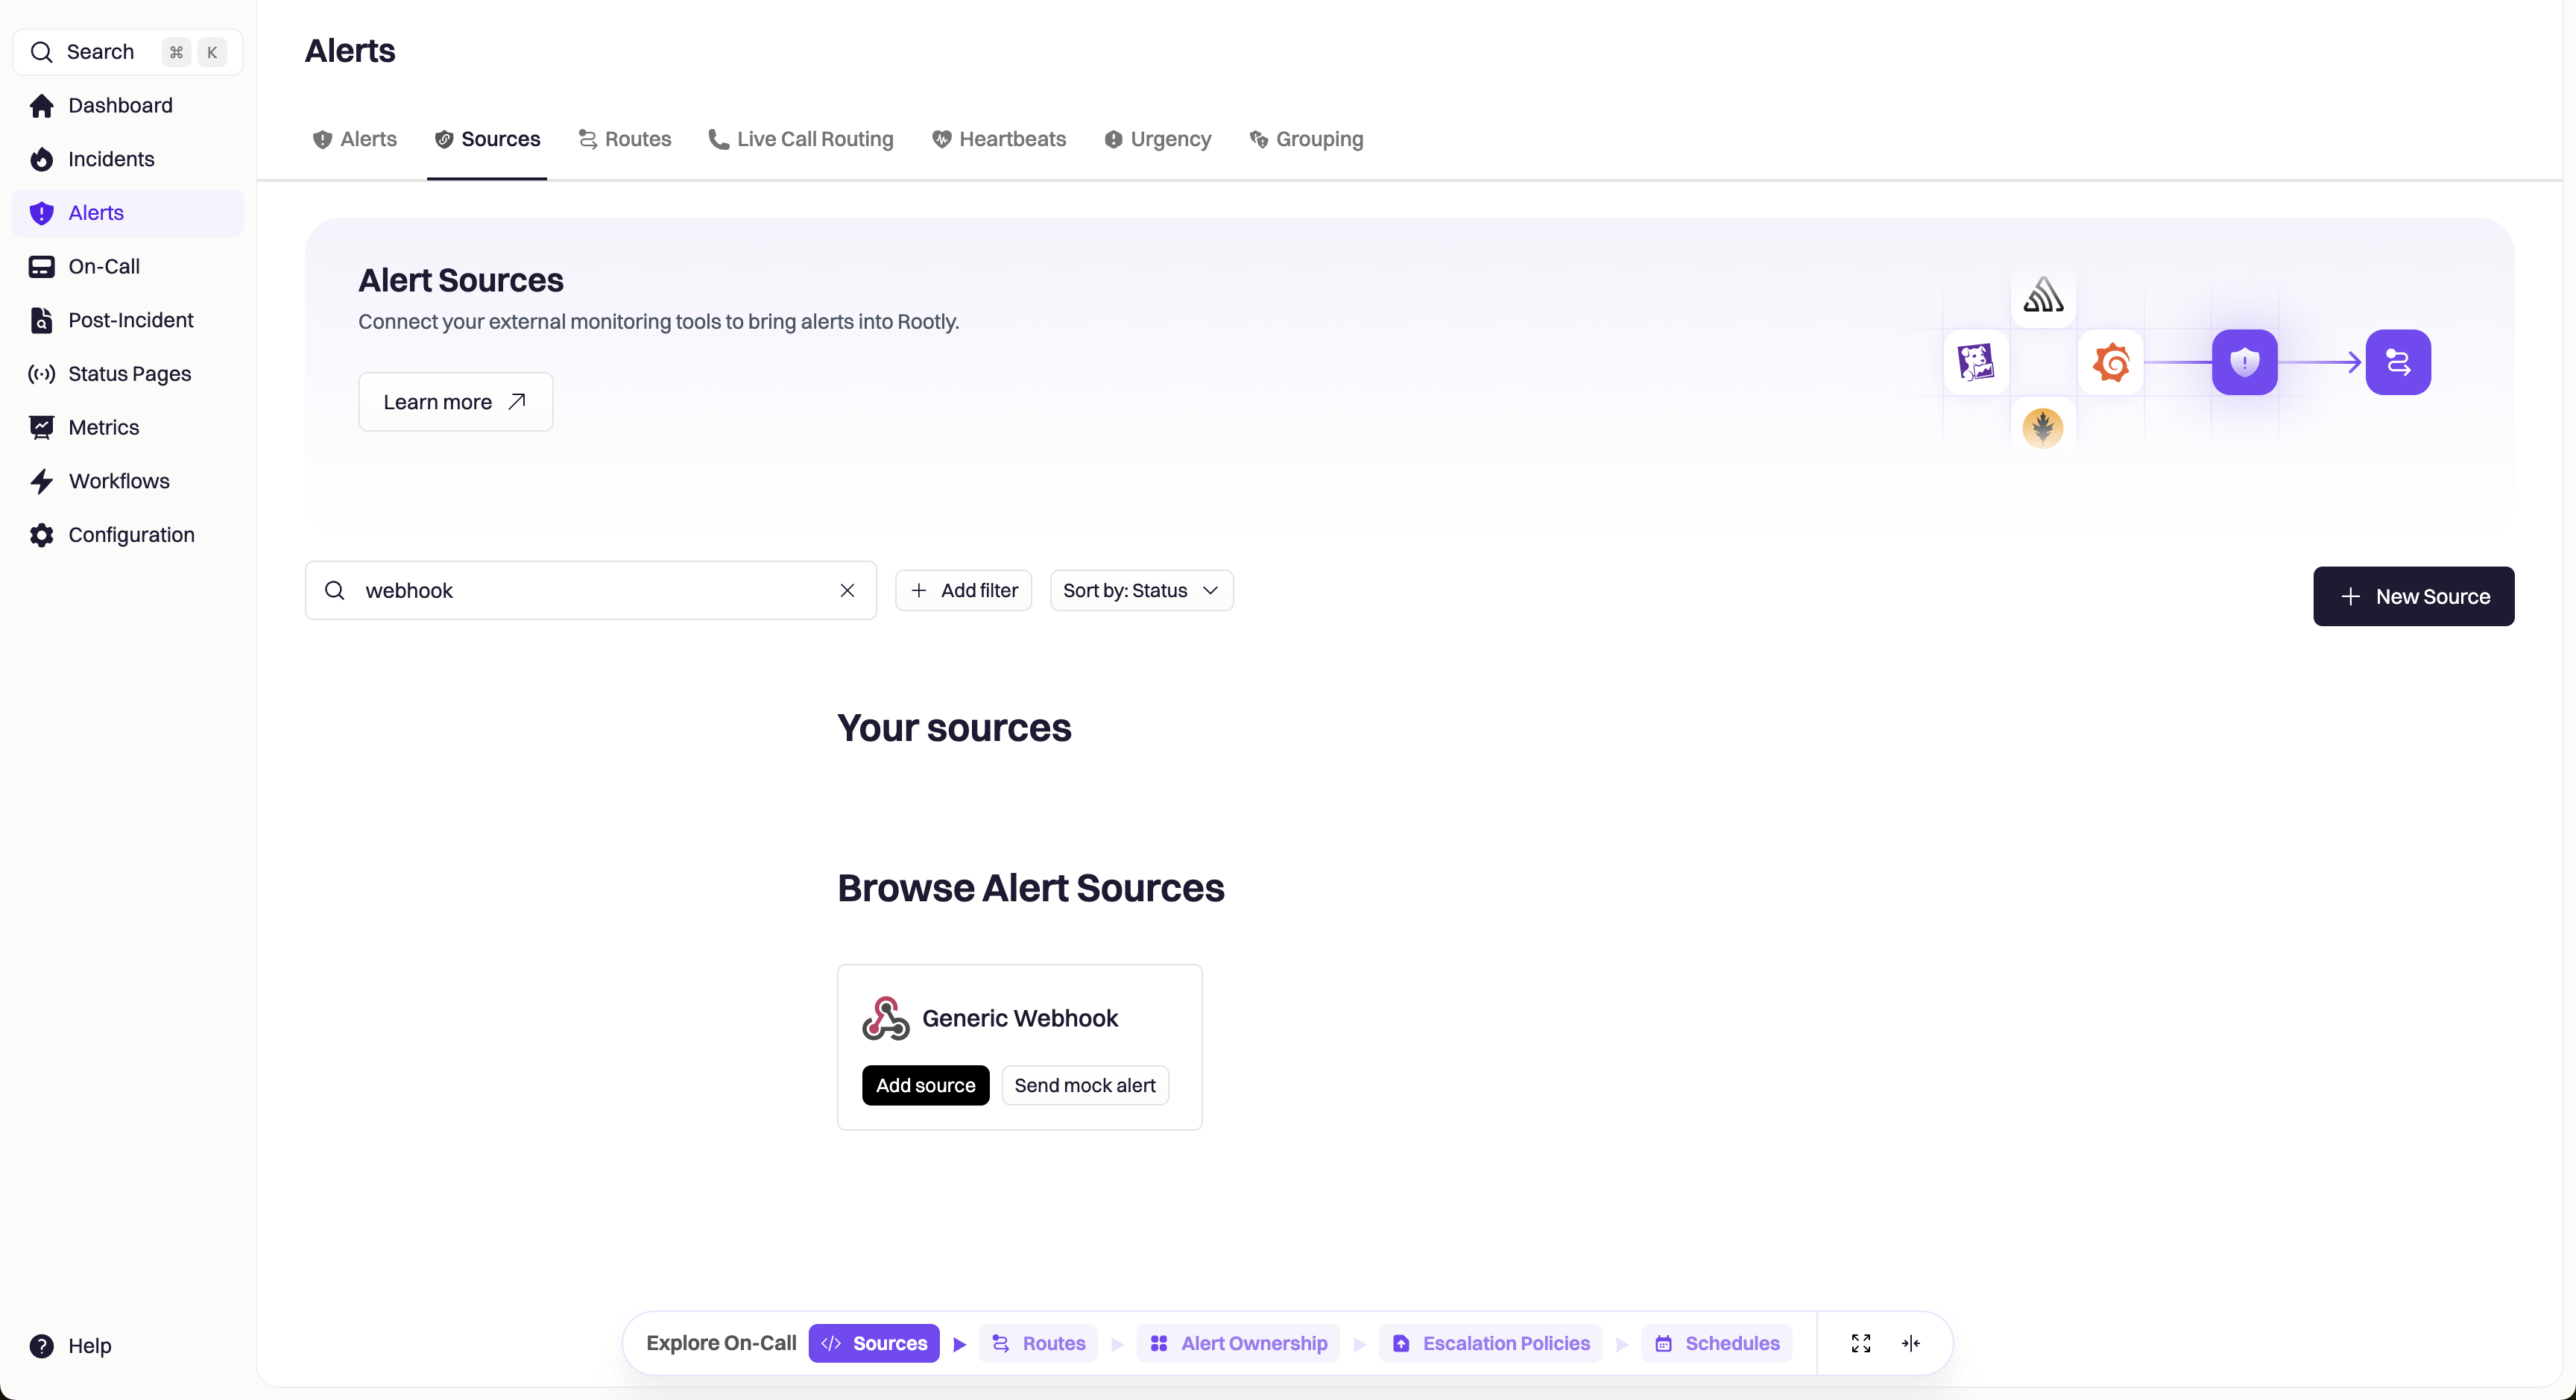 * **Name**: Give your webhook a descriptive name (e.g., "Metoro Alerts")
* **Owning Team**: Select the team that will manage this webhook
* **Name**: Give your webhook a descriptive name (e.g., "Metoro Alerts")
* **Owning Team**: Select the team that will manage this webhook
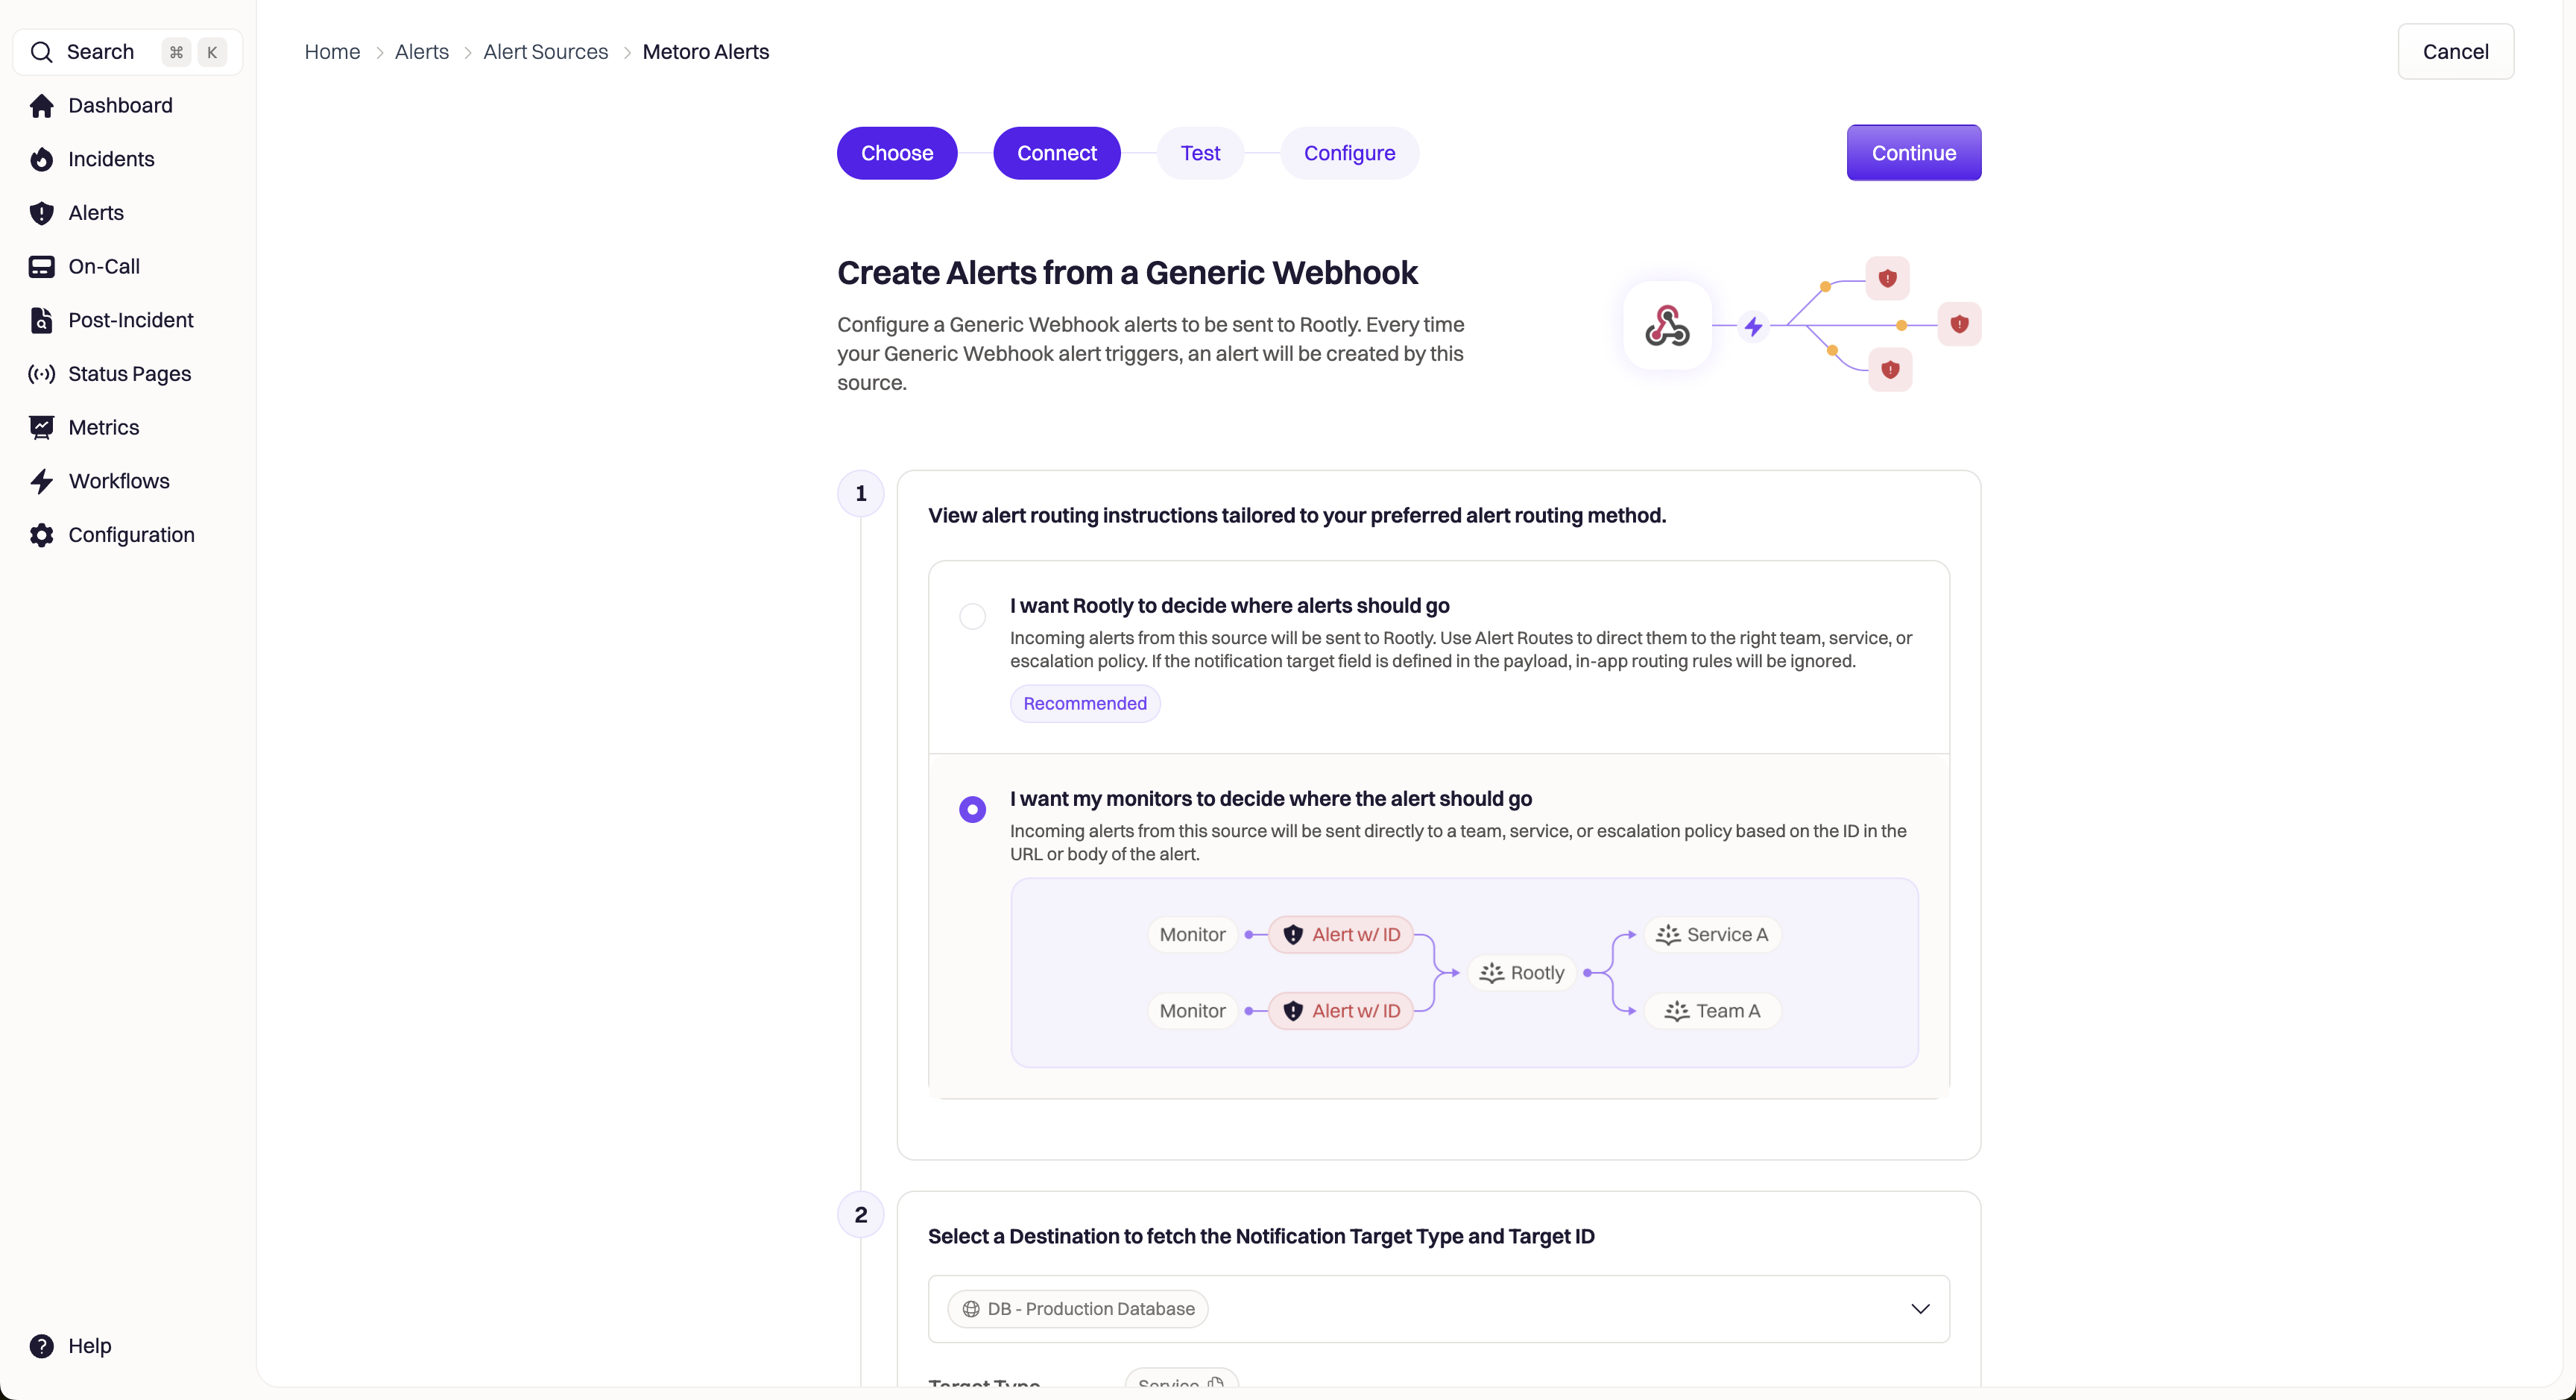
 Follow the directions to set up the alert routing method in Rootly.
 After selecting the routing method, Rootly will provide you with a webhook URL (with placeholders) and a Bearer token.
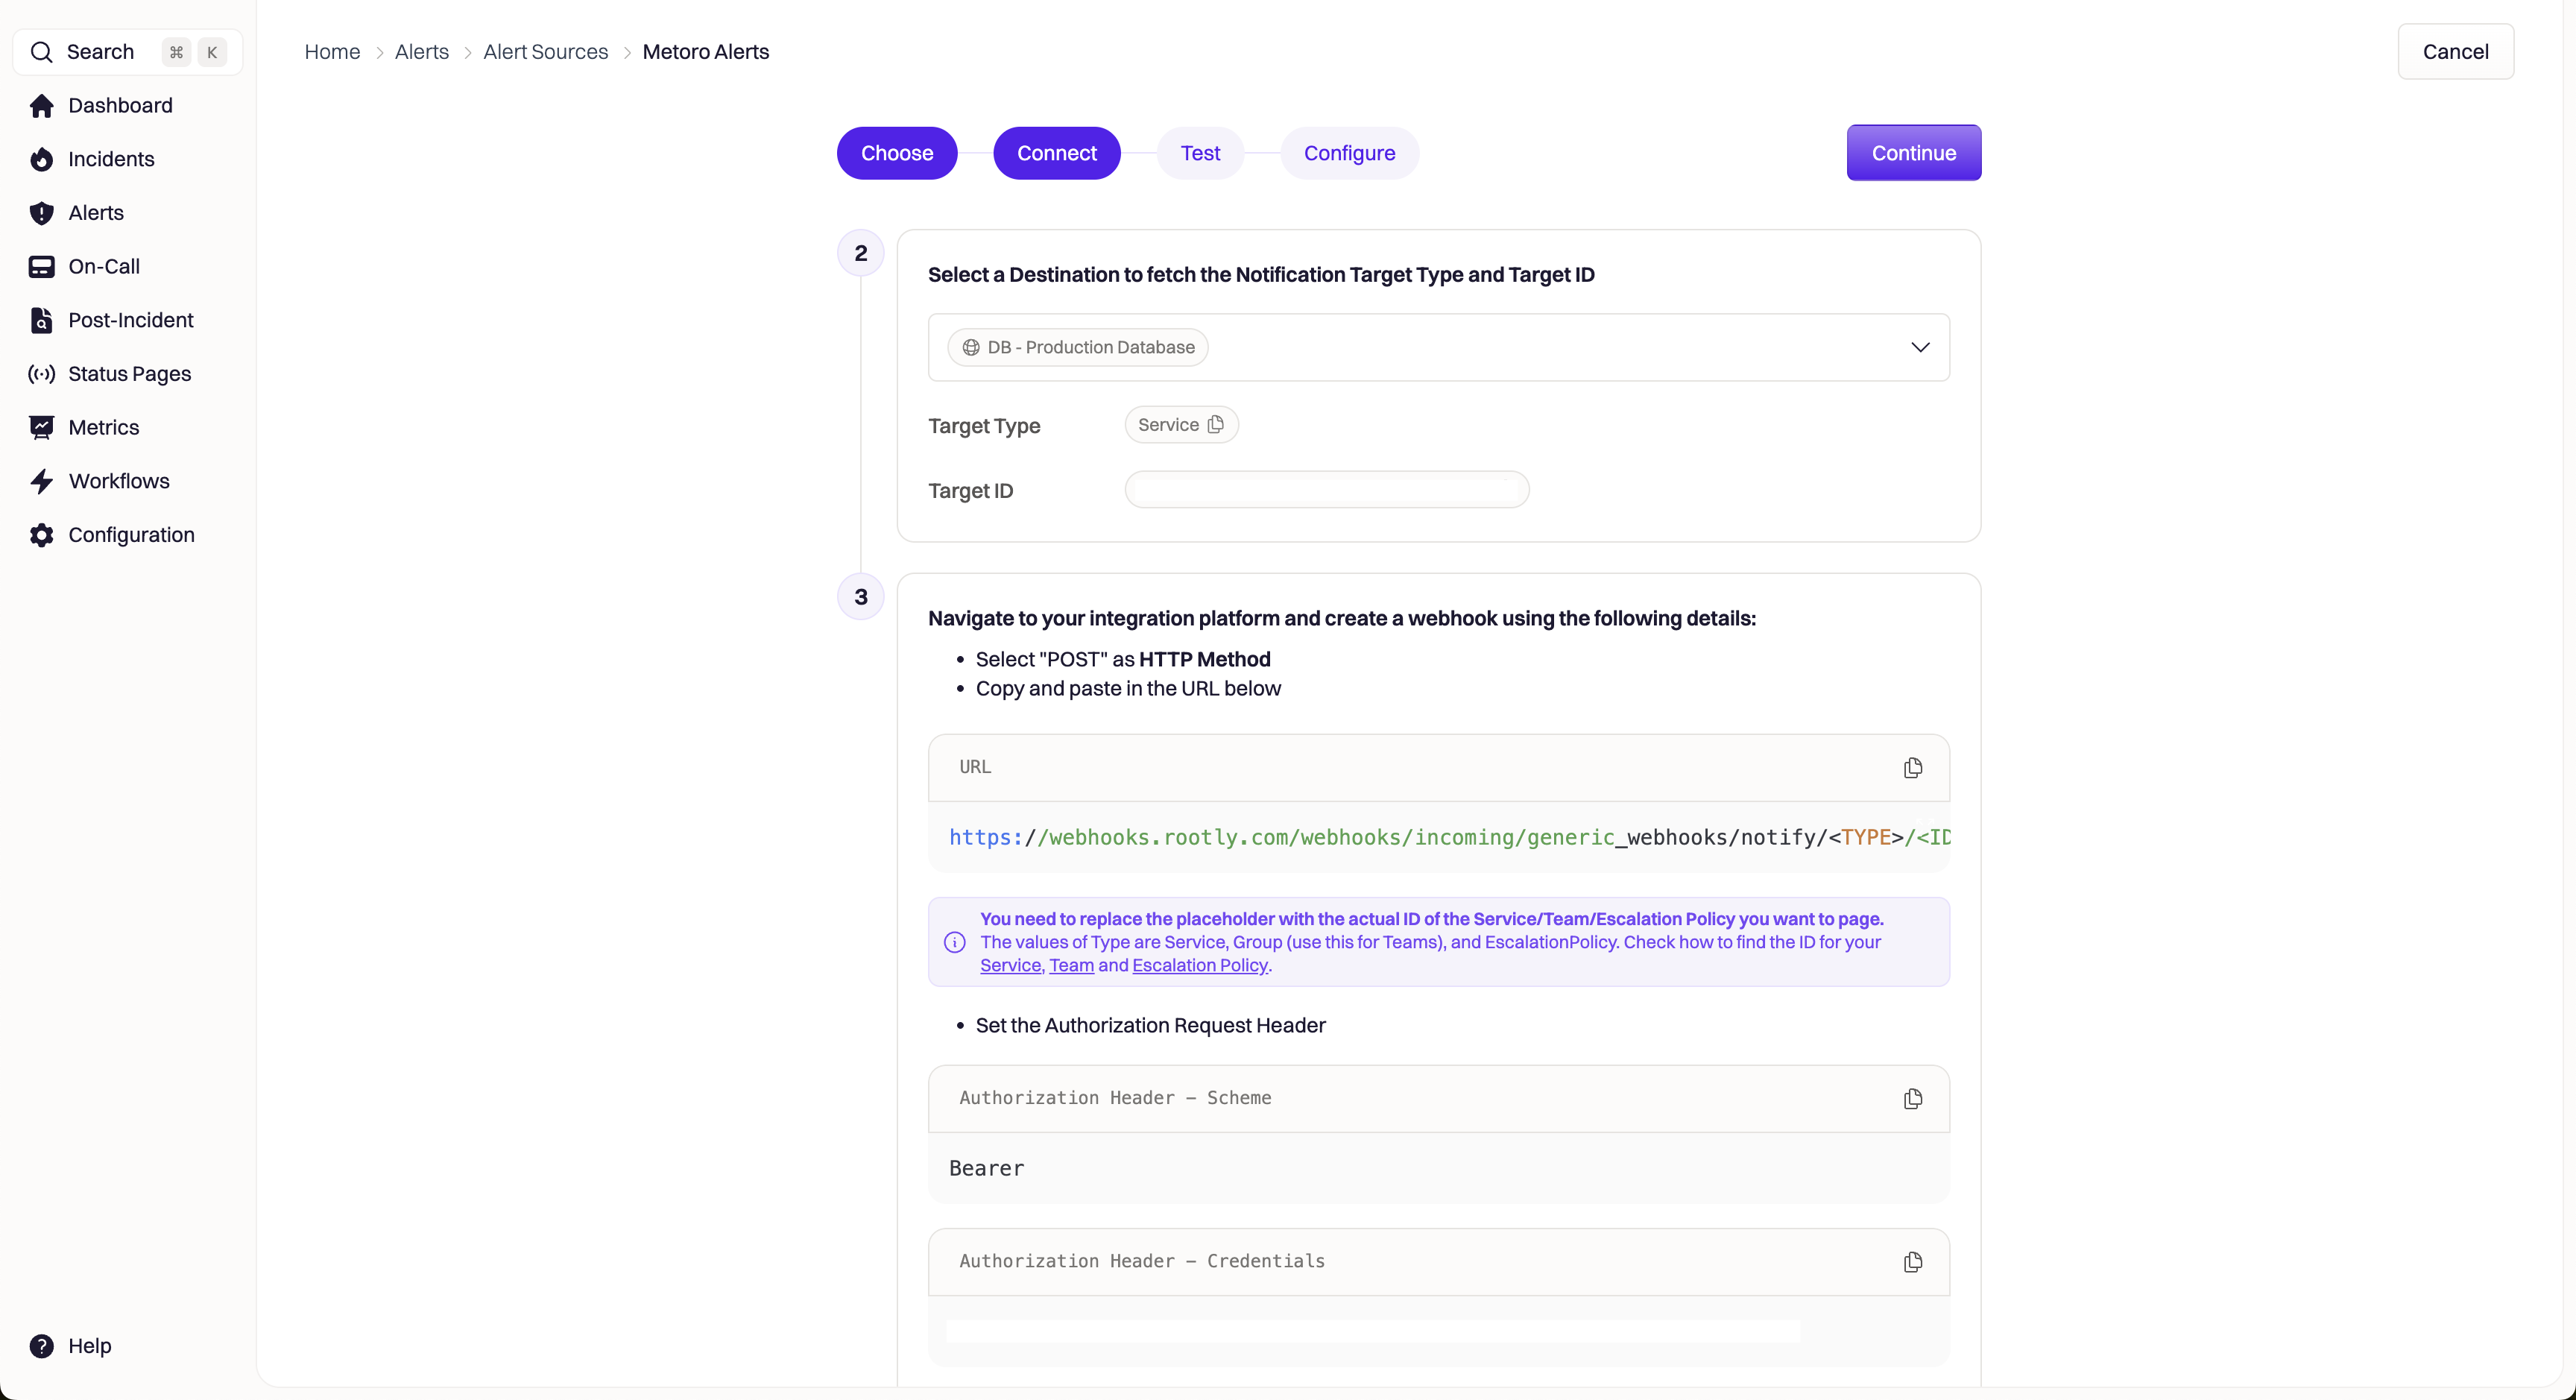 Make sure to replace the placeholder sections in the webhook URL with what is provided in the Notification Target Type and Target ID section in Rootly.
Once you securely store the webhook URL and Bearer token, make sure to save the current configuration in Rootly and proceed to adding the webhook in Metoro.
We will add the copied webhook URL and Bearer token in Metoro. Make sure to copy the webhook URL and Bearer token from Rootly before proceeding.
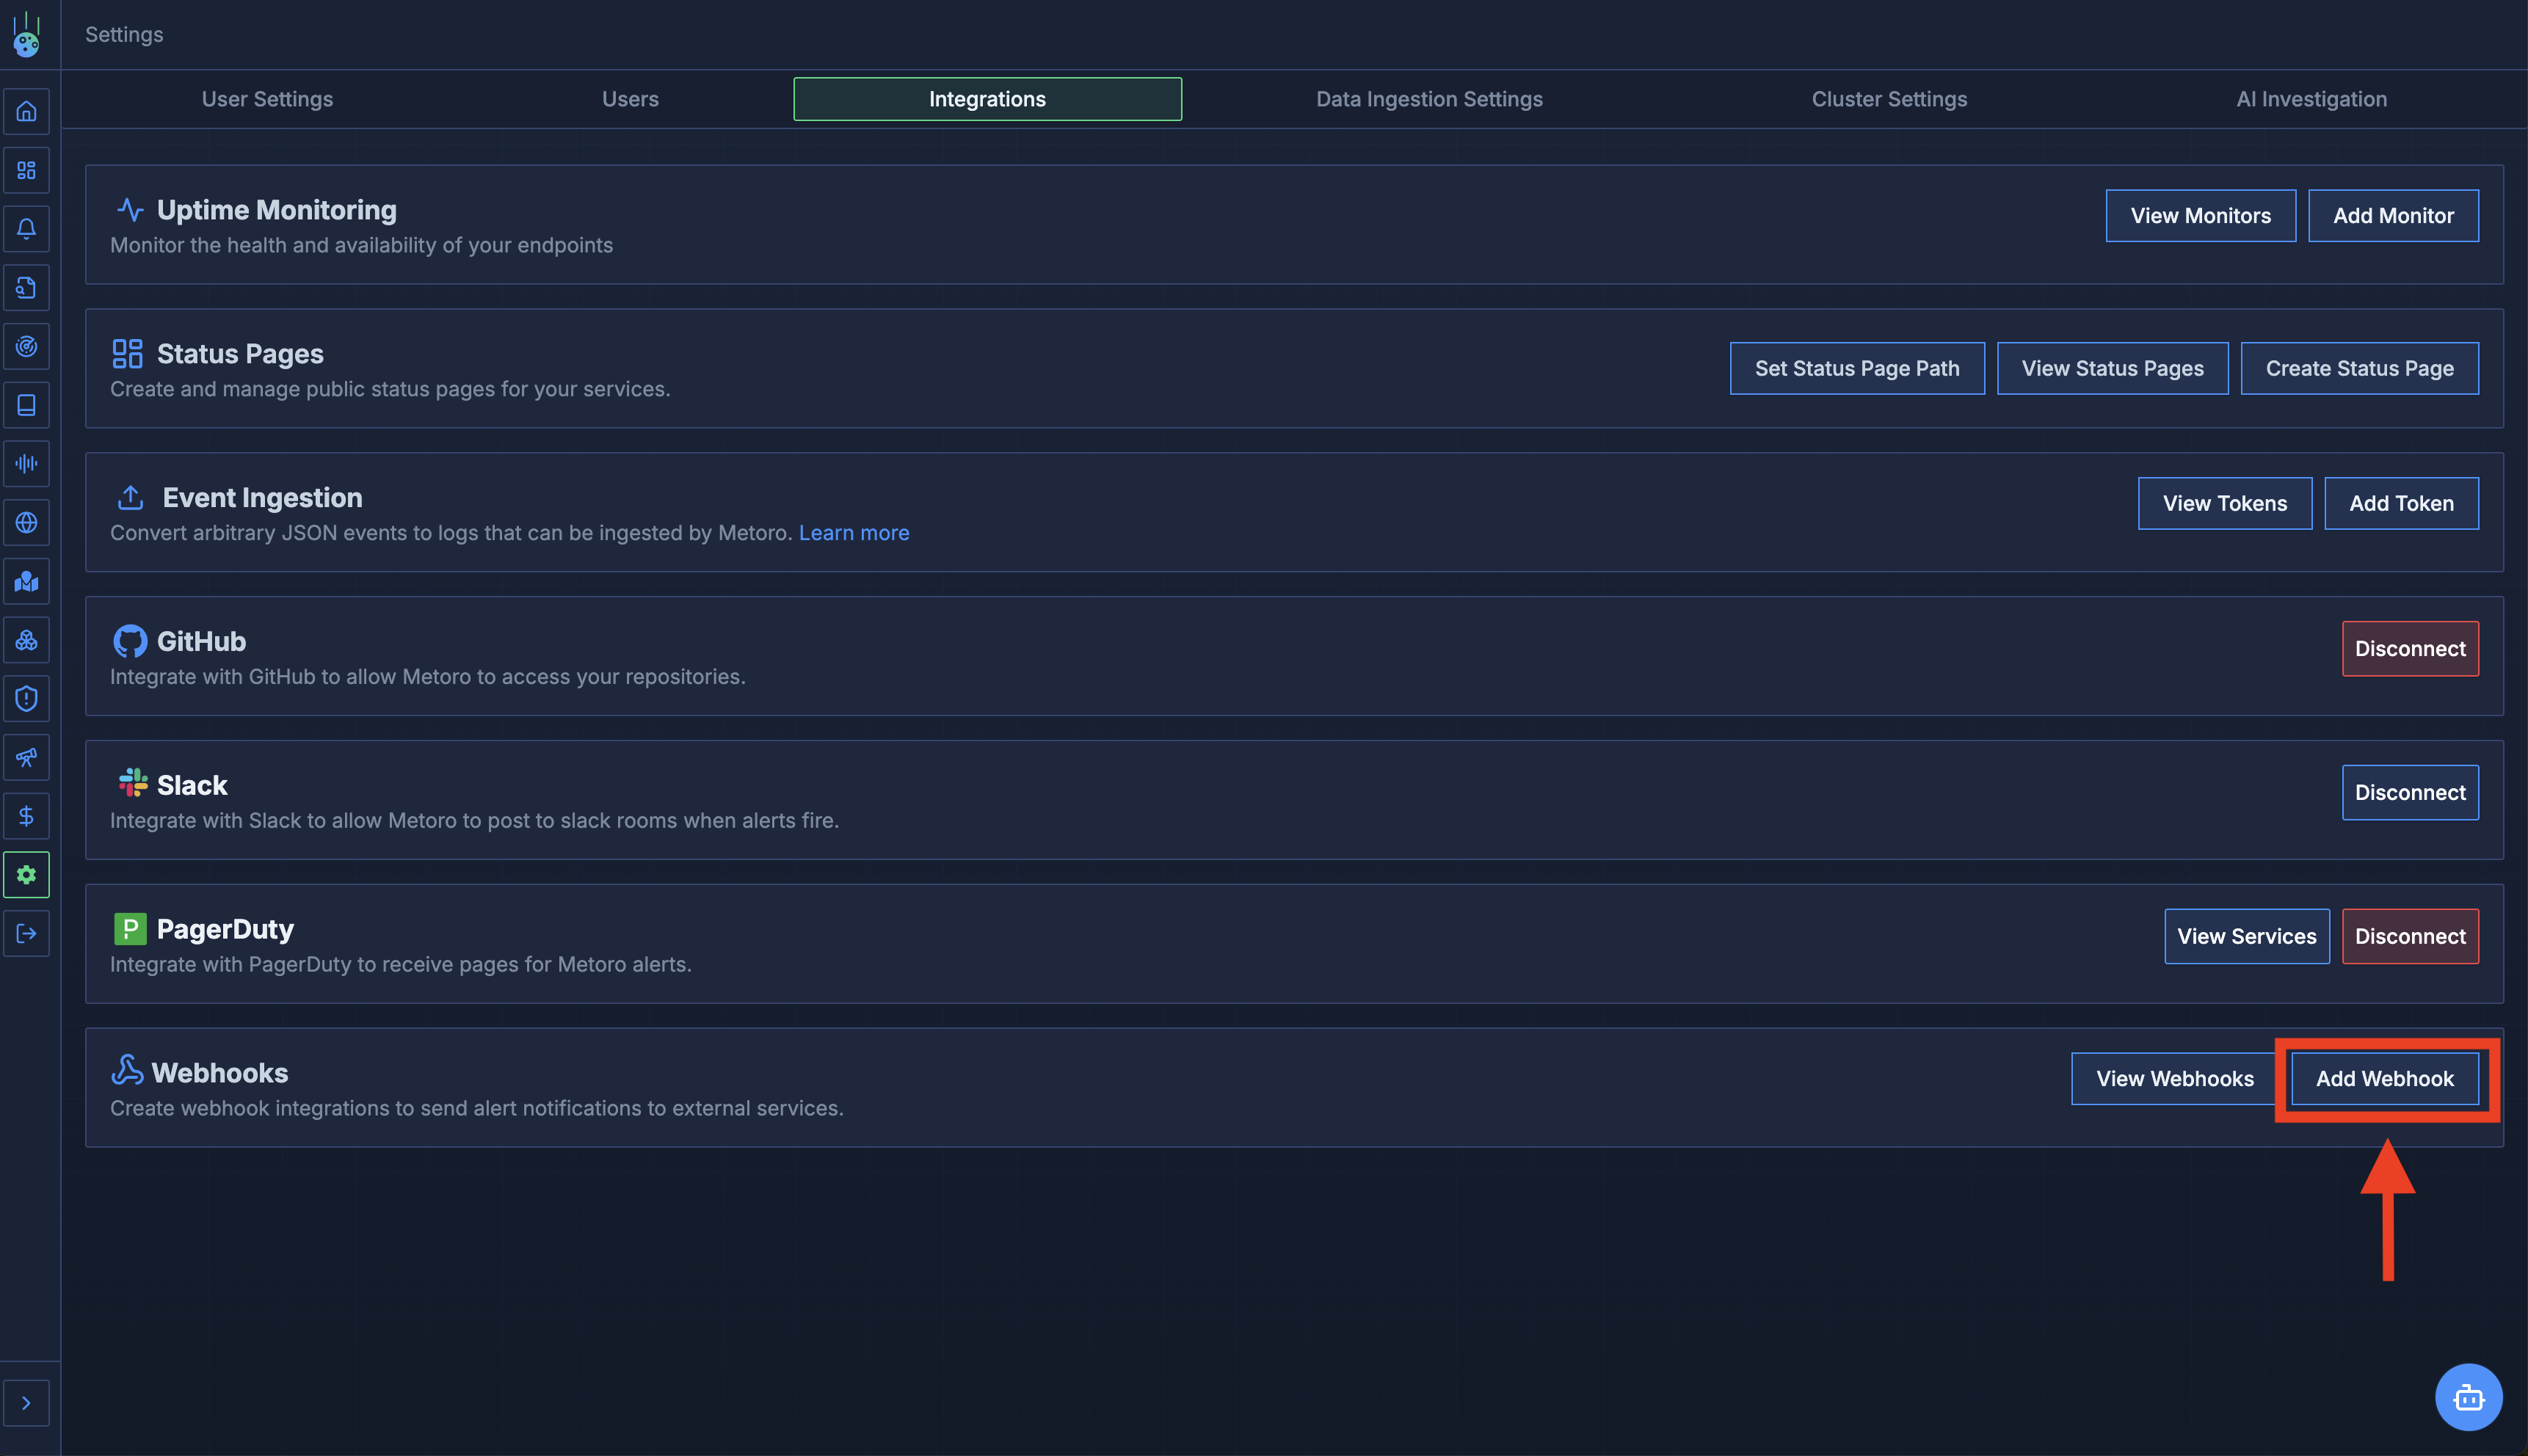
Go to the [Integrations page](https://us-east.metoro.io/settings?tab=integrations) in Metoro and next to the Webhooks, click on the **Add Webhook** button.
Make sure to replace the placeholder sections in the webhook URL with what is provided in the Notification Target Type and Target ID section in Rootly.
Once you securely store the webhook URL and Bearer token, make sure to save the current configuration in Rootly and proceed to adding the webhook in Metoro.
We will add the copied webhook URL and Bearer token in Metoro. Make sure to copy the webhook URL and Bearer token from Rootly before proceeding.
Go to the [Integrations page](https://us-east.metoro.io/settings?tab=integrations) in Metoro and next to the Webhooks, click on the **Add Webhook** button.
 Fill in the details of the webhook that you copied from Rootly:
* **Name**: "Rootly Alert Webhook" (or your preferred name, can be the same as in Rootly)
* **URL**: Paste the webhook URL from Rootly (make sure to replace any placeholders with actual values)
* **HTTP Method**: POST
* **Headers**: Add the Authorization header
* Click **Add Header**
* **Header Name**: `Authorization`
* **Header Value**: `Bearer YOUR_ROOTLY_TOKEN` (replace with your actual token)
* **Body Template**: Leave empty to use the default JSON payload, or customize it as needed.
We recommend customizing the body template to include specific fields that you can use on the Rootly side to name alerts, create links to the alerts in Metoro, define alert severity, and auto-resolve behavior.
Please check [Webhook Integration documentation](/docs/integrations/webhooks#template-variables) to see what variables you can use in the webhook body template.
Fill in the details of the webhook that you copied from Rootly:
* **Name**: "Rootly Alert Webhook" (or your preferred name, can be the same as in Rootly)
* **URL**: Paste the webhook URL from Rootly (make sure to replace any placeholders with actual values)
* **HTTP Method**: POST
* **Headers**: Add the Authorization header
* Click **Add Header**
* **Header Name**: `Authorization`
* **Header Value**: `Bearer YOUR_ROOTLY_TOKEN` (replace with your actual token)
* **Body Template**: Leave empty to use the default JSON payload, or customize it as needed.
We recommend customizing the body template to include specific fields that you can use on the Rootly side to name alerts, create links to the alerts in Metoro, define alert severity, and auto-resolve behavior.
Please check [Webhook Integration documentation](/docs/integrations/webhooks#template-variables) to see what variables you can use in the webhook body template.
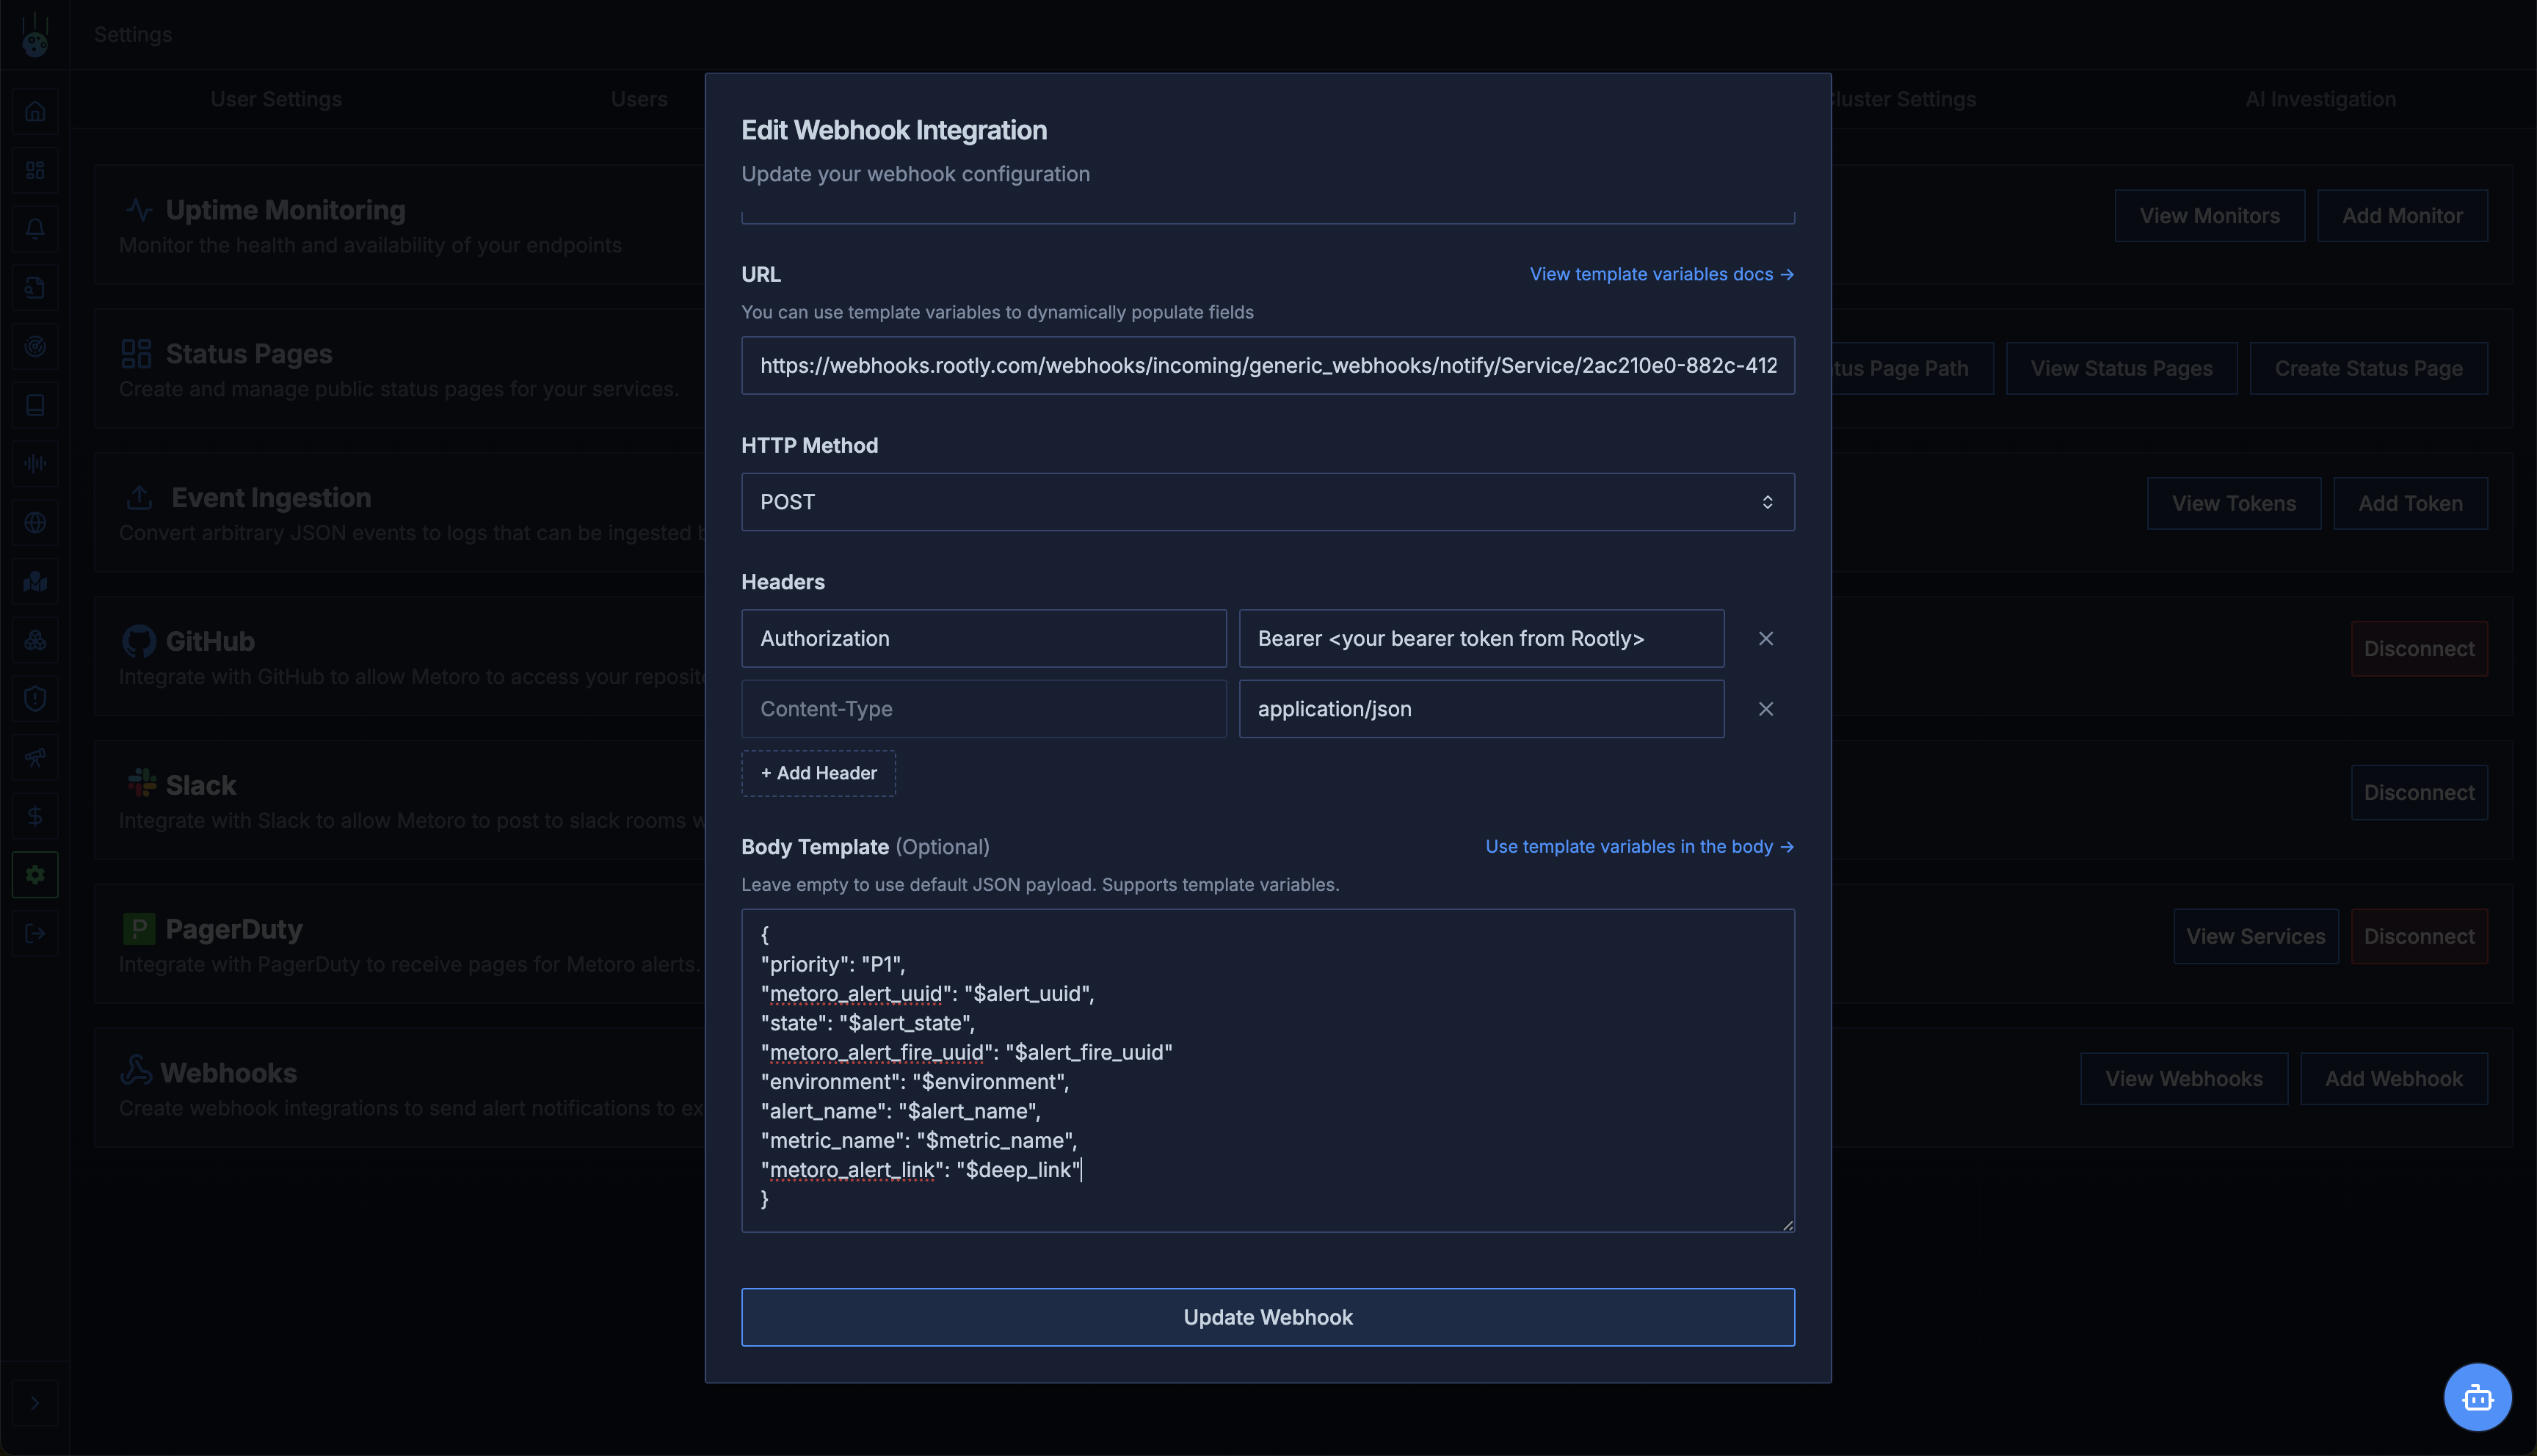 For the purpose of this guide, we will use the following body template:
```json theme={null}
{
"priority": "P1",
"metoro_alert_uuid": "$alert_uuid",
"state": "$alert_state",
"metoro_alert_fire_uuid": "$alert_fire_uuid",
"alert_name": "$alert_name",
"metric_name": "$metric_name",
"metoro_alert_link": "$deep_link"
}
```
Any field that starts with `$` is an alert template variable and will be populated dynamically depending on the alert.
Now that we know how the webhook body will look like, we can define how the alert will be created in Rootly (such as the alert name, description, link to source, etc.).
Go back to the Rootly webhook configuration page and fill in the **Alert Content** details by clicking on the **Edit** button.
**Alert Title**: Enter `{{alert.data.alert_name}}`. This will use the `alert_name` JSON field from the Webhook body that we defined earlier.
**Alert Description**: Enter any details you want to include in the alert description. You can use fields from the webhook body like `{{alert.data.alert_name}}`, `{{alert.data.state}}`, etc.
**Alert Source Link**: Enter `{{alert.data.metoro_alert_link}}`. This will create a link to the alert in Metoro.
Click **Save** to save the alert content configuration.
For the purpose of this guide, we will use the following body template:
```json theme={null}
{
"priority": "P1",
"metoro_alert_uuid": "$alert_uuid",
"state": "$alert_state",
"metoro_alert_fire_uuid": "$alert_fire_uuid",
"alert_name": "$alert_name",
"metric_name": "$metric_name",
"metoro_alert_link": "$deep_link"
}
```
Any field that starts with `$` is an alert template variable and will be populated dynamically depending on the alert.
Now that we know how the webhook body will look like, we can define how the alert will be created in Rootly (such as the alert name, description, link to source, etc.).
Go back to the Rootly webhook configuration page and fill in the **Alert Content** details by clicking on the **Edit** button.
**Alert Title**: Enter `{{alert.data.alert_name}}`. This will use the `alert_name` JSON field from the Webhook body that we defined earlier.
**Alert Description**: Enter any details you want to include in the alert description. You can use fields from the webhook body like `{{alert.data.alert_name}}`, `{{alert.data.state}}`, etc.
**Alert Source Link**: Enter `{{alert.data.metoro_alert_link}}`. This will create a link to the alert in Metoro.
Click **Save** to save the alert content configuration.
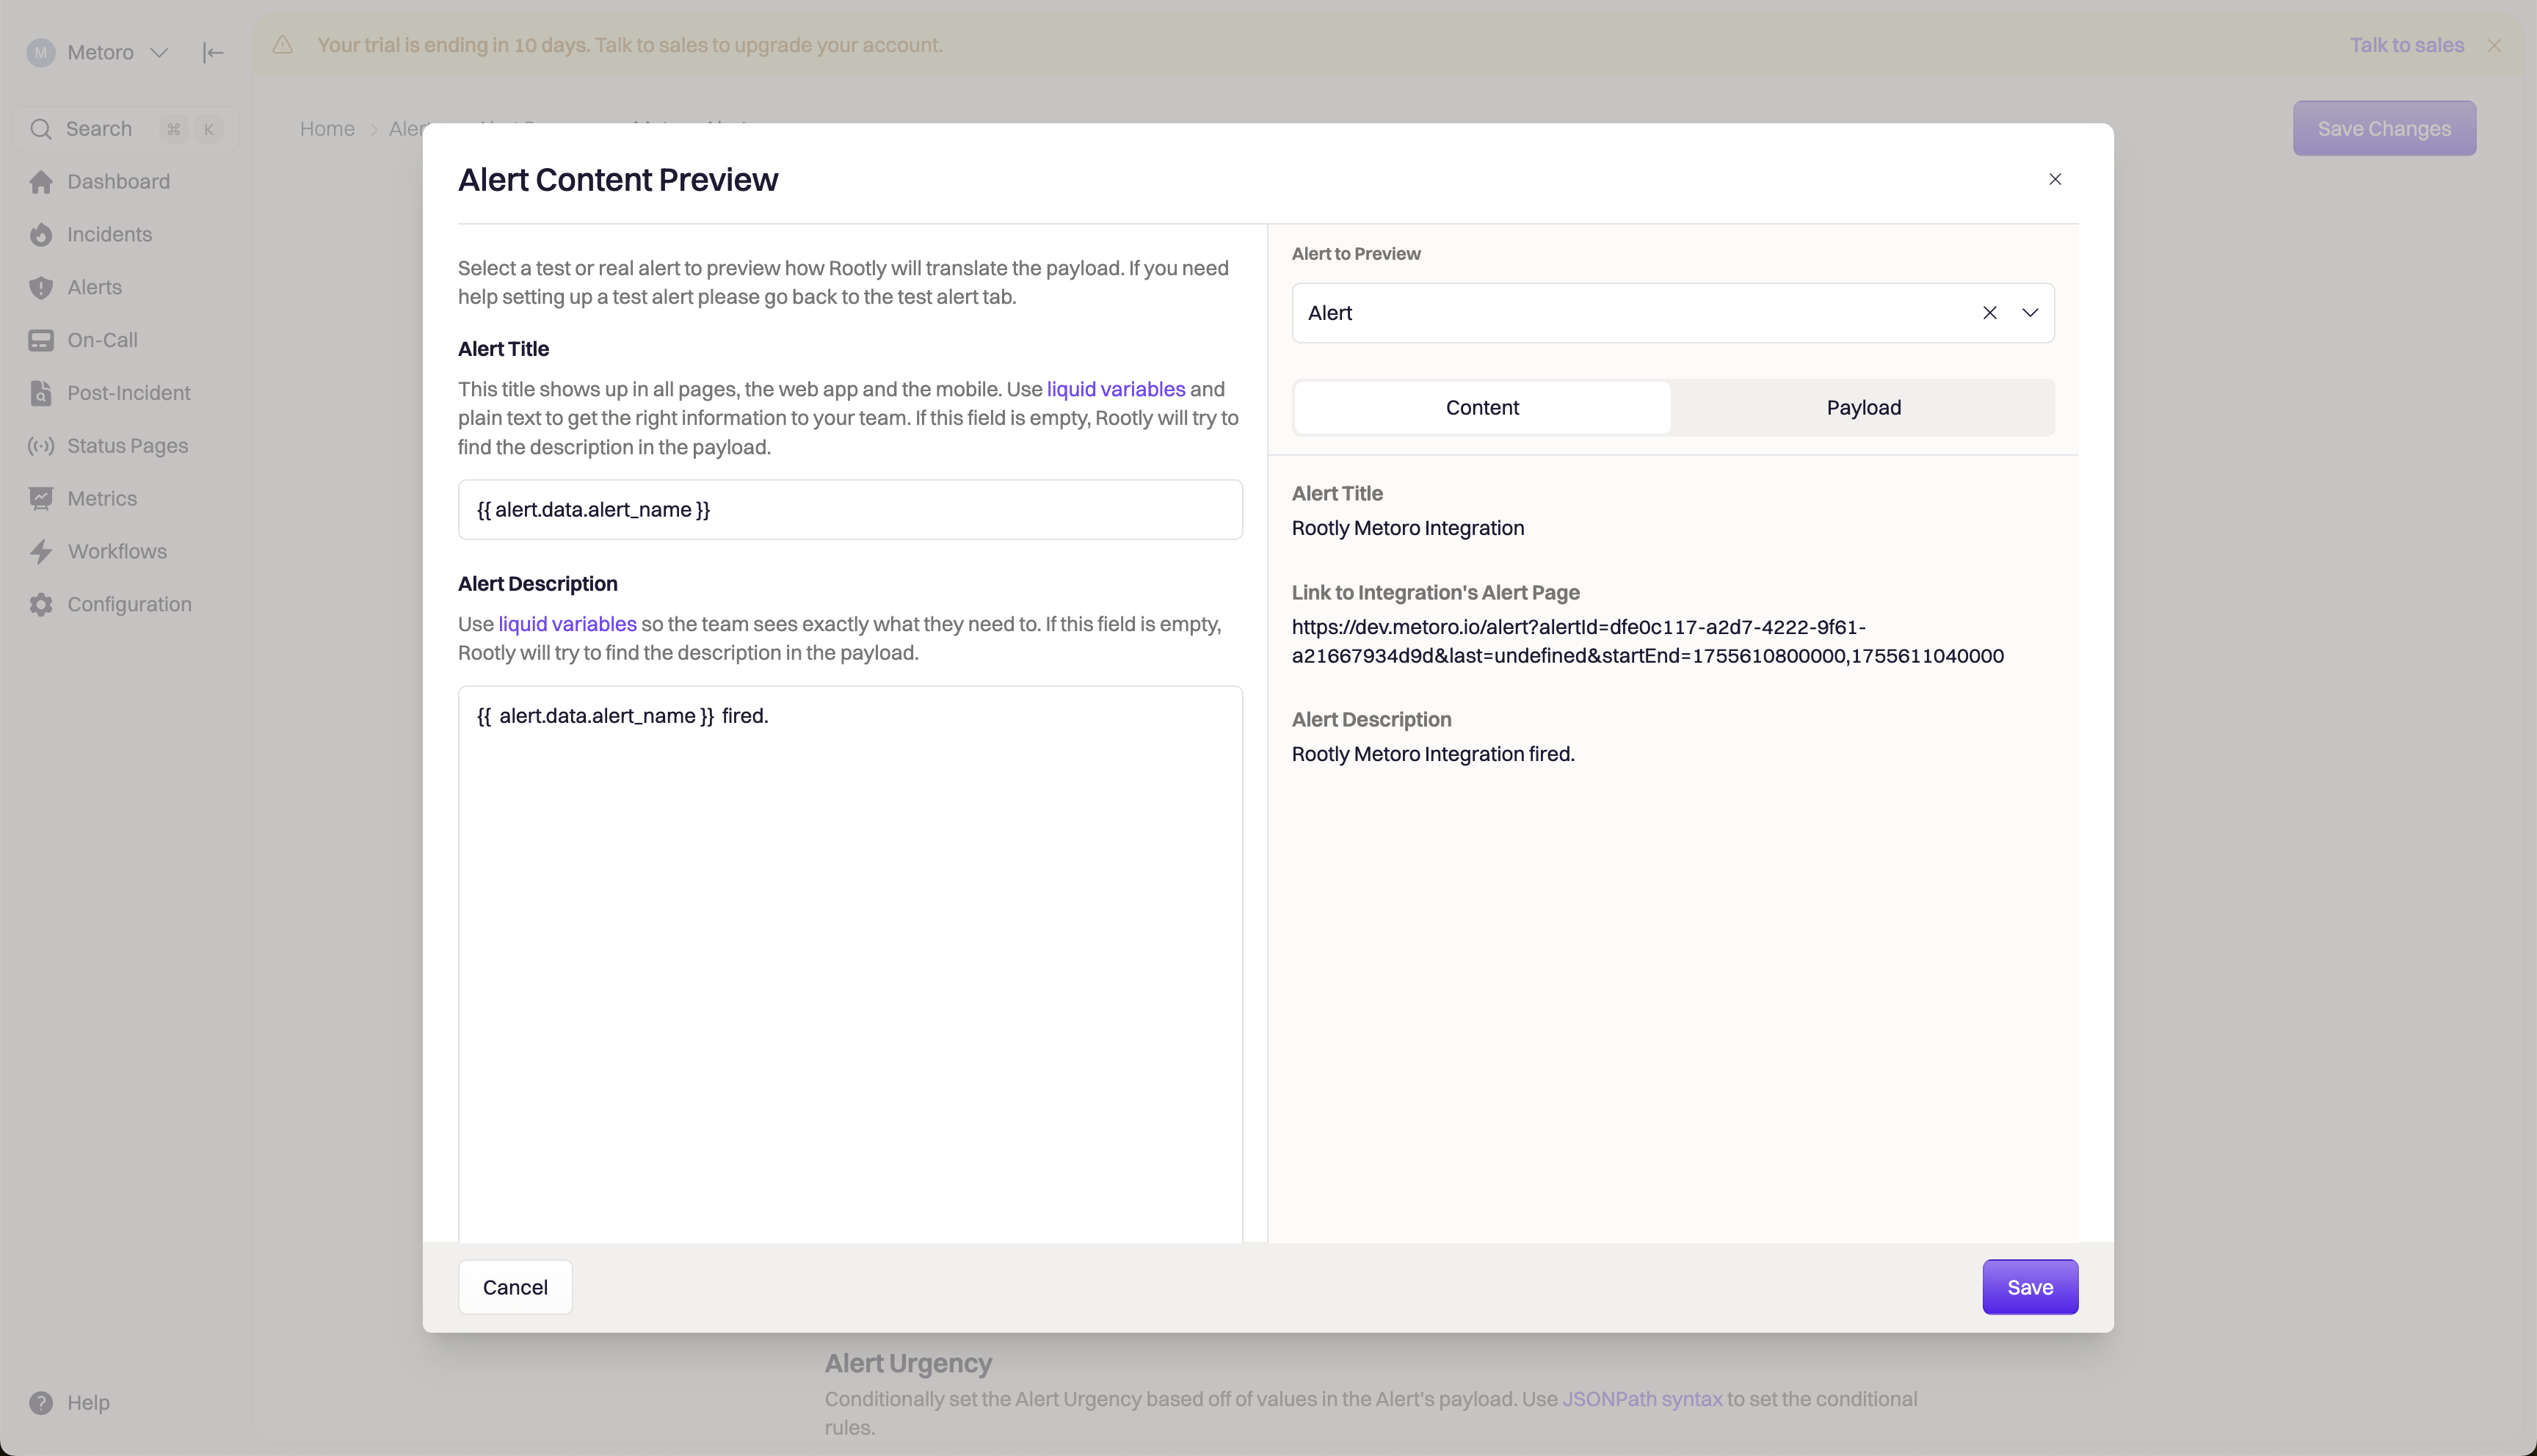 It might be useful to send a test notification to Rootly by creating a test alert in Metoro with Alert Destination as the Rootly Webhook that we created earlier. This way, Rootly will auto-complete template/liquid variables and will show you a preview of how the alert will look like when it is created.
By using the webhook JSON body, you can create a custom alert urgency in Rootly. This is useful to define how urgent the alert is and how it should be handled by the on-call team.
It might be useful to send a test notification to Rootly by creating a test alert in Metoro with Alert Destination as the Rootly Webhook that we created earlier. This way, Rootly will auto-complete template/liquid variables and will show you a preview of how the alert will look like when it is created.
By using the webhook JSON body, you can create a custom alert urgency in Rootly. This is useful to define how urgent the alert is and how it should be handled by the on-call team.
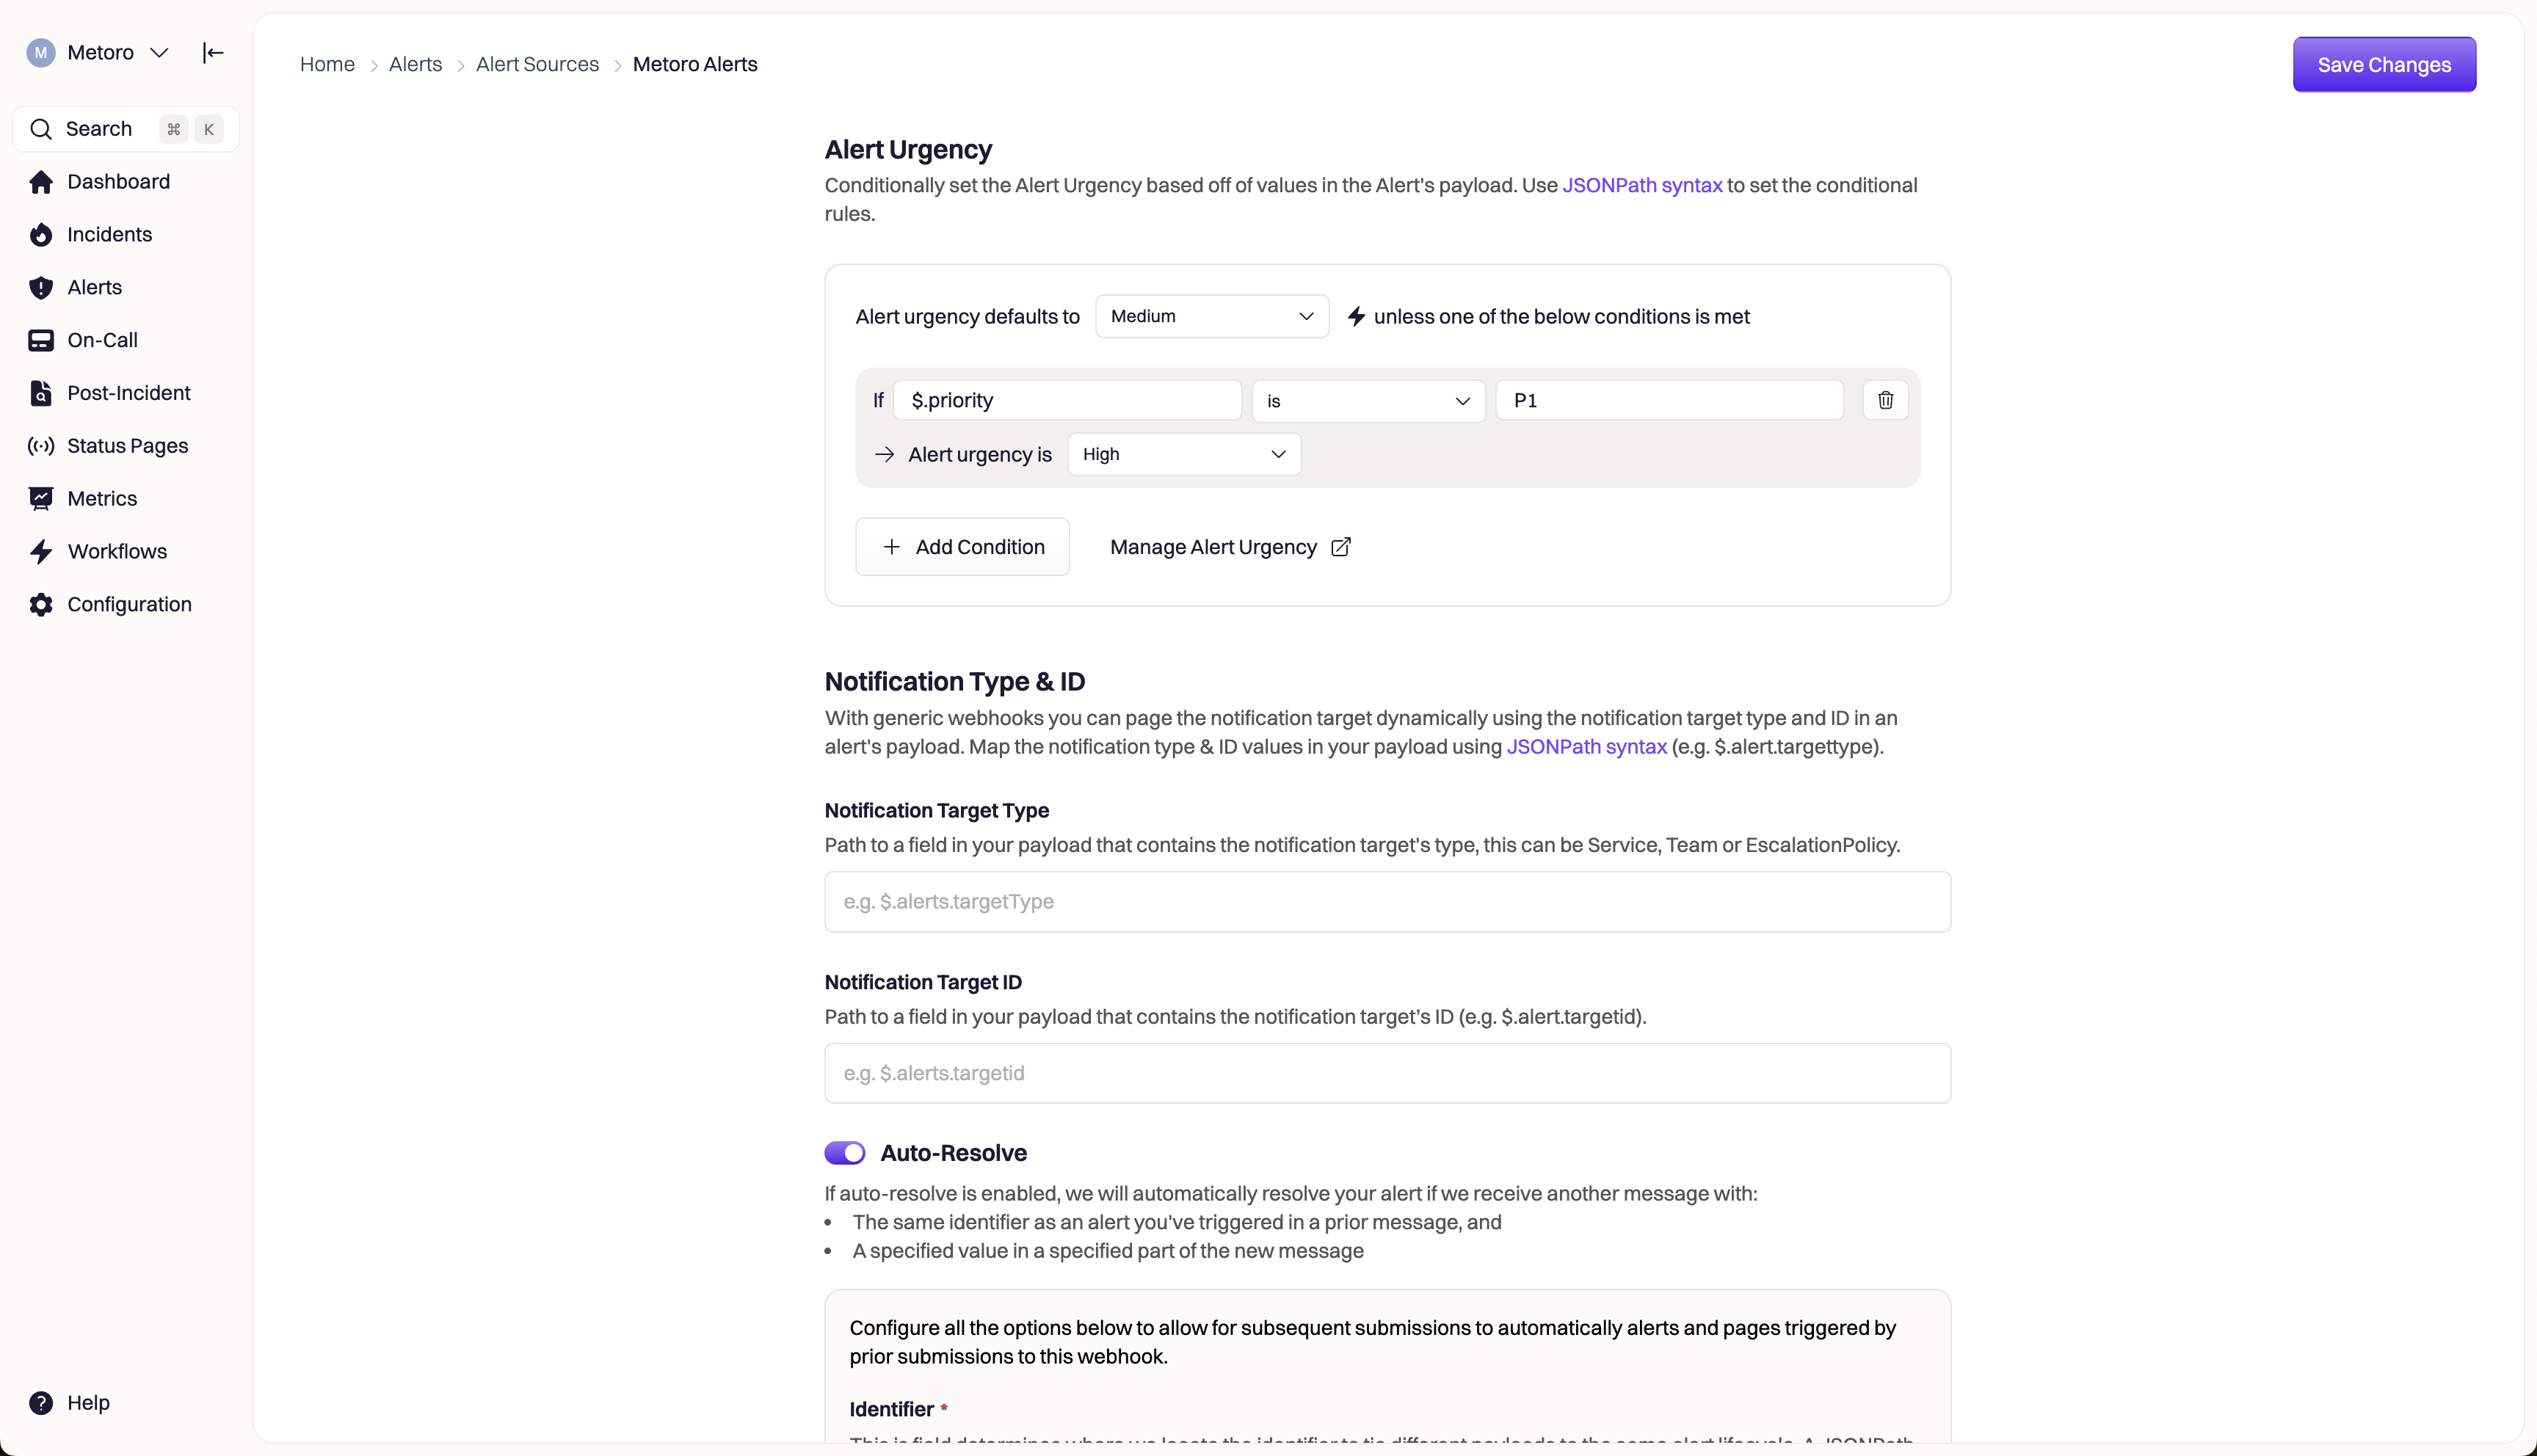 To enable auto-resolve for alerts, you can configure the webhook to automatically resolve incidents when the alert state changes to "resolved". This is done by setting the `alert_state` field in the webhook body to "resolved".
This is optional, but recommended to ensure that incidents are automatically resolved when the underlying alert recovers.
From the webhook body that we defined earlier, we can use the `metoro_alert_fire_uuid` to identify alert triggers that are sent to Rootly and `state` field to identify the alert state. When the alert state changes to "resolved", Rootly will automatically resolve the incident.
Enter the following details in the **Auto-Resolve** section:
**Identifier**: `$.metoro_alert_fire_uuid`
**Field location**: `$.state`
**Field Value**: `resolved`
To enable auto-resolve for alerts, you can configure the webhook to automatically resolve incidents when the alert state changes to "resolved". This is done by setting the `alert_state` field in the webhook body to "resolved".
This is optional, but recommended to ensure that incidents are automatically resolved when the underlying alert recovers.
From the webhook body that we defined earlier, we can use the `metoro_alert_fire_uuid` to identify alert triggers that are sent to Rootly and `state` field to identify the alert state. When the alert state changes to "resolved", Rootly will automatically resolve the incident.
Enter the following details in the **Auto-Resolve** section:
**Identifier**: `$.metoro_alert_fire_uuid`
**Field location**: `$.state`
**Field Value**: `resolved`
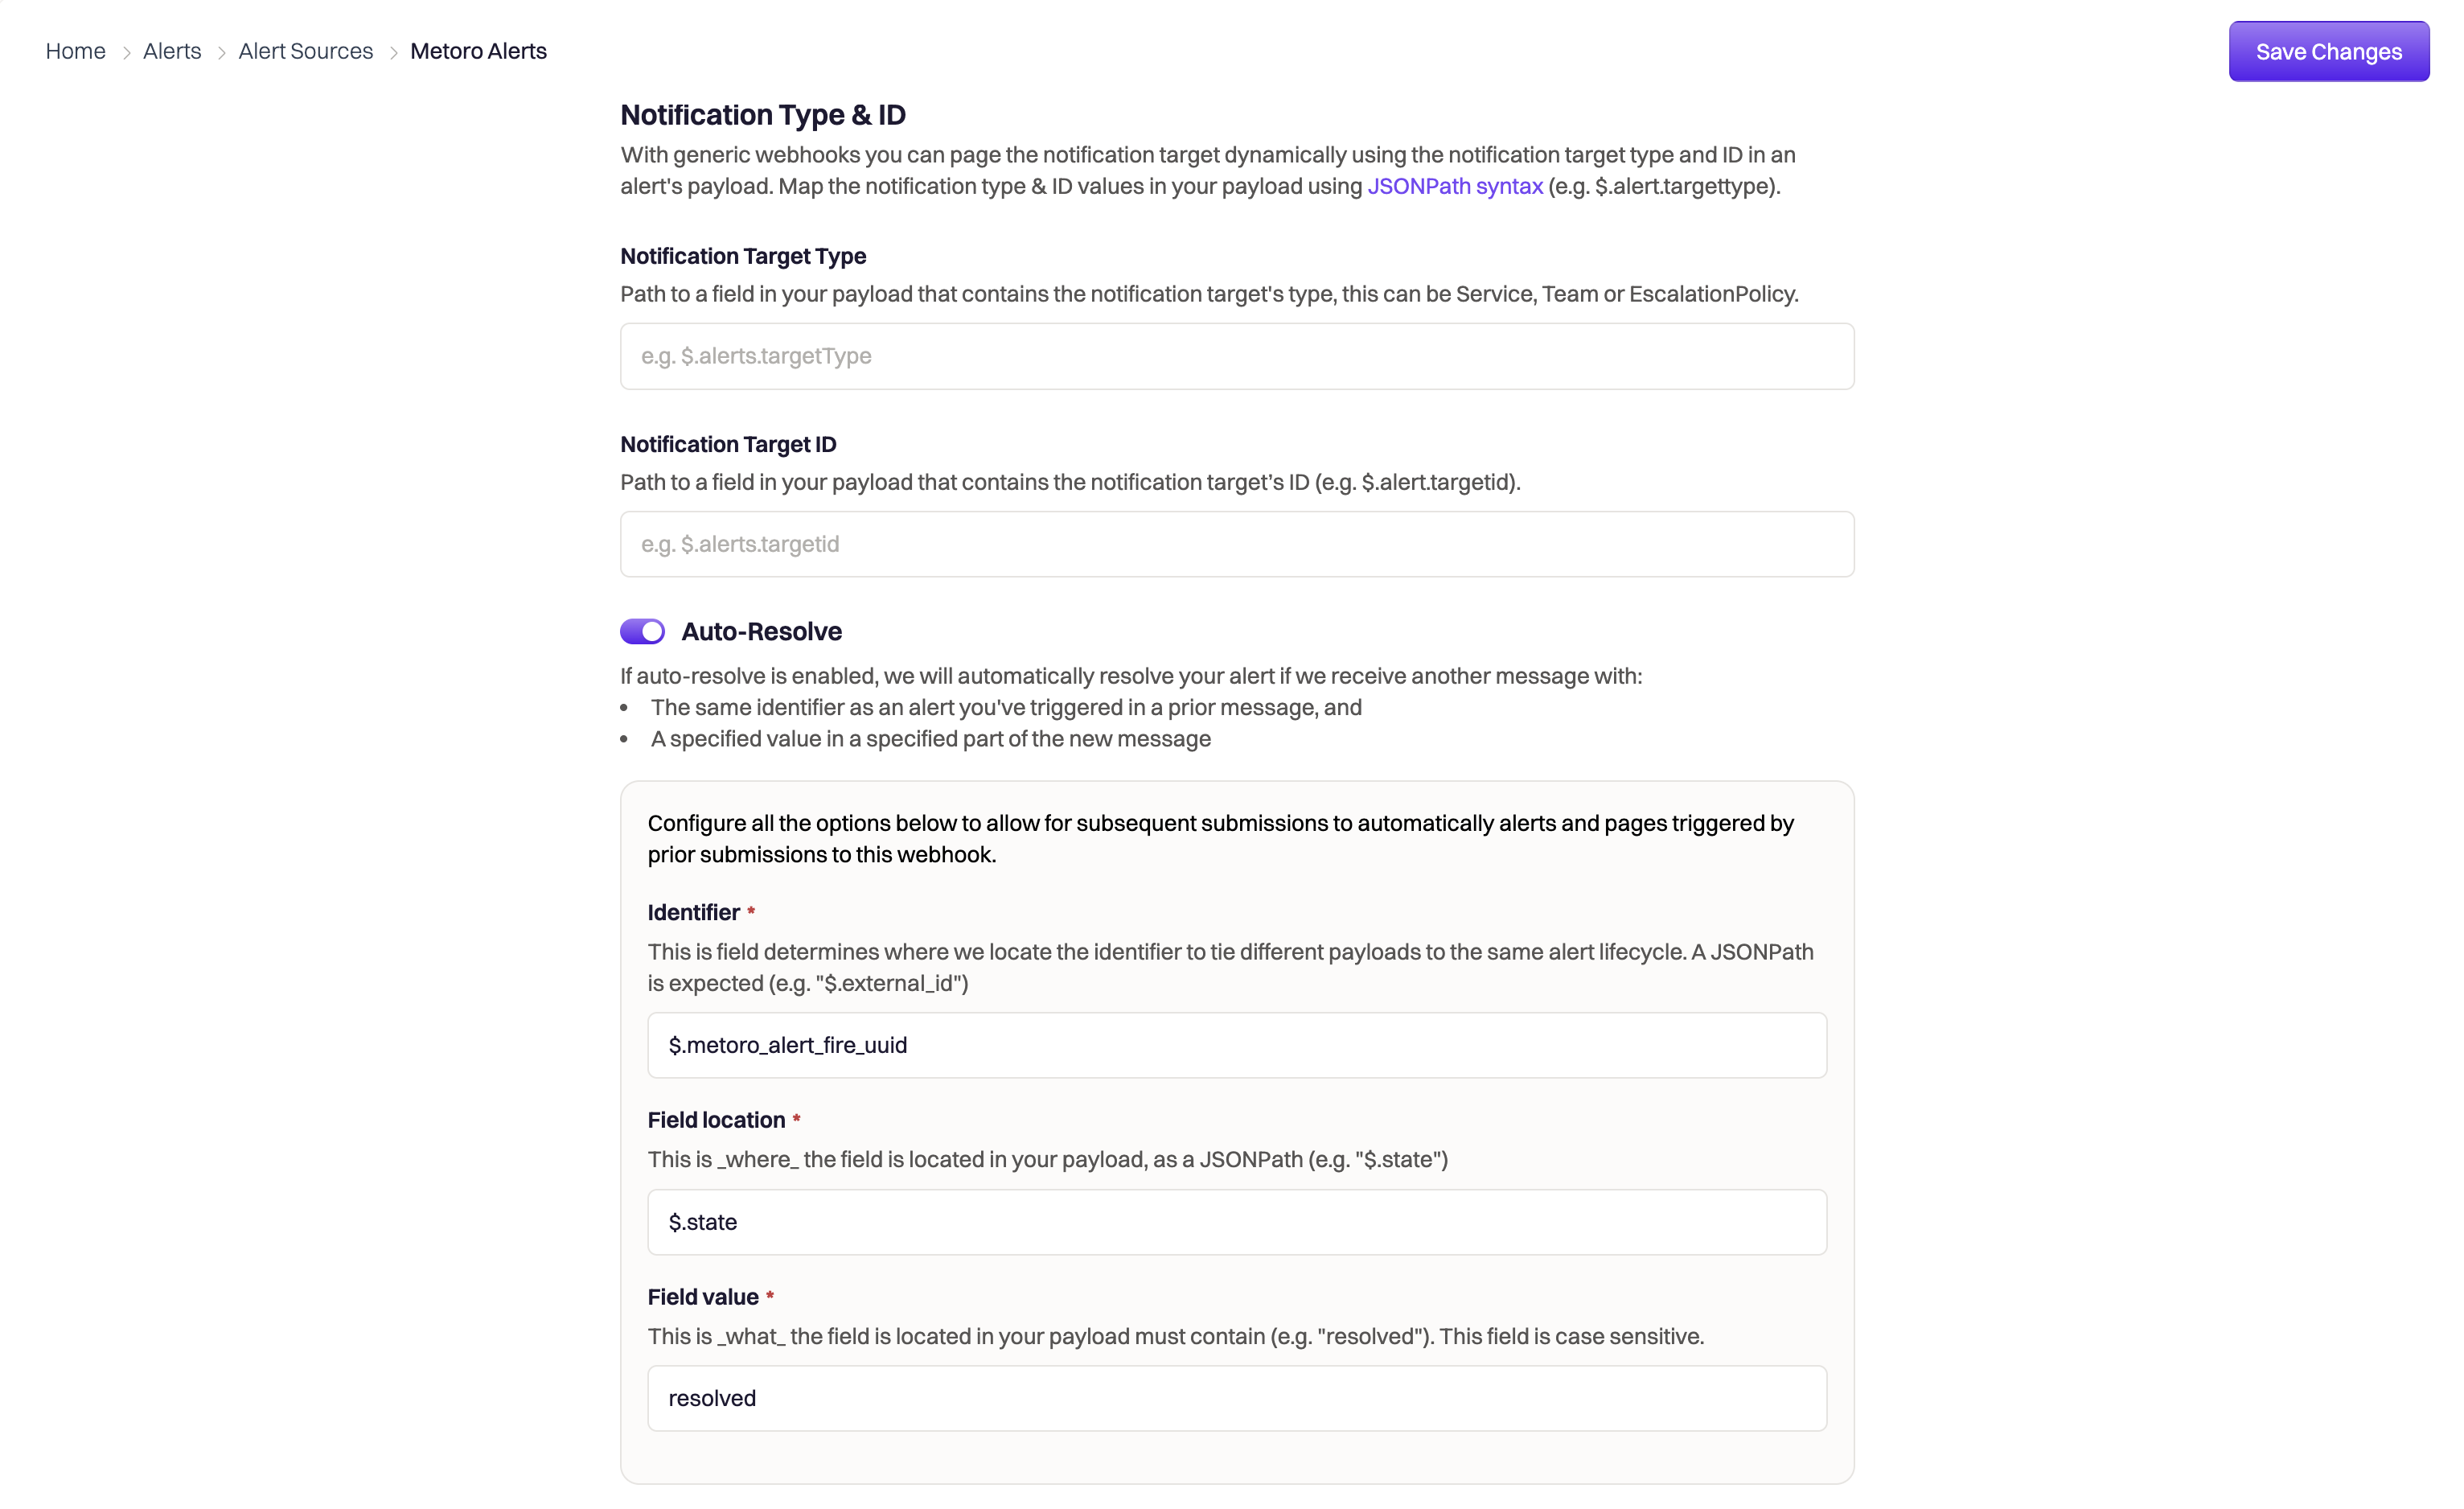 Click **Save Changes**.
Alternatively, you can use the `$metoro_alert_uuid` field as the identifier. Please read more in [Handling Grouped Alerts](/docs/integrations/rootly#important%3A-handling-grouped-alerts) section below to pick the best option that suits your use case.
### Step 2: Use Rootly Webhook as Alert Destination in Metoro
Navigate to **Alerts** in Metoro and create a new alert or edit an existing one
In the **Select Destination** section:
* Click **Add Destination**
* Select **Webhook** from the dropdown
* Choose your Webhook from the list (the one you created in Rootly and added to Metoro in the previous step)
Click **Save Changes**.
Alternatively, you can use the `$metoro_alert_uuid` field as the identifier. Please read more in [Handling Grouped Alerts](/docs/integrations/rootly#important%3A-handling-grouped-alerts) section below to pick the best option that suits your use case.
### Step 2: Use Rootly Webhook as Alert Destination in Metoro
Navigate to **Alerts** in Metoro and create a new alert or edit an existing one
In the **Select Destination** section:
* Click **Add Destination**
* Select **Webhook** from the dropdown
* Choose your Webhook from the list (the one you created in Rootly and added to Metoro in the previous step)
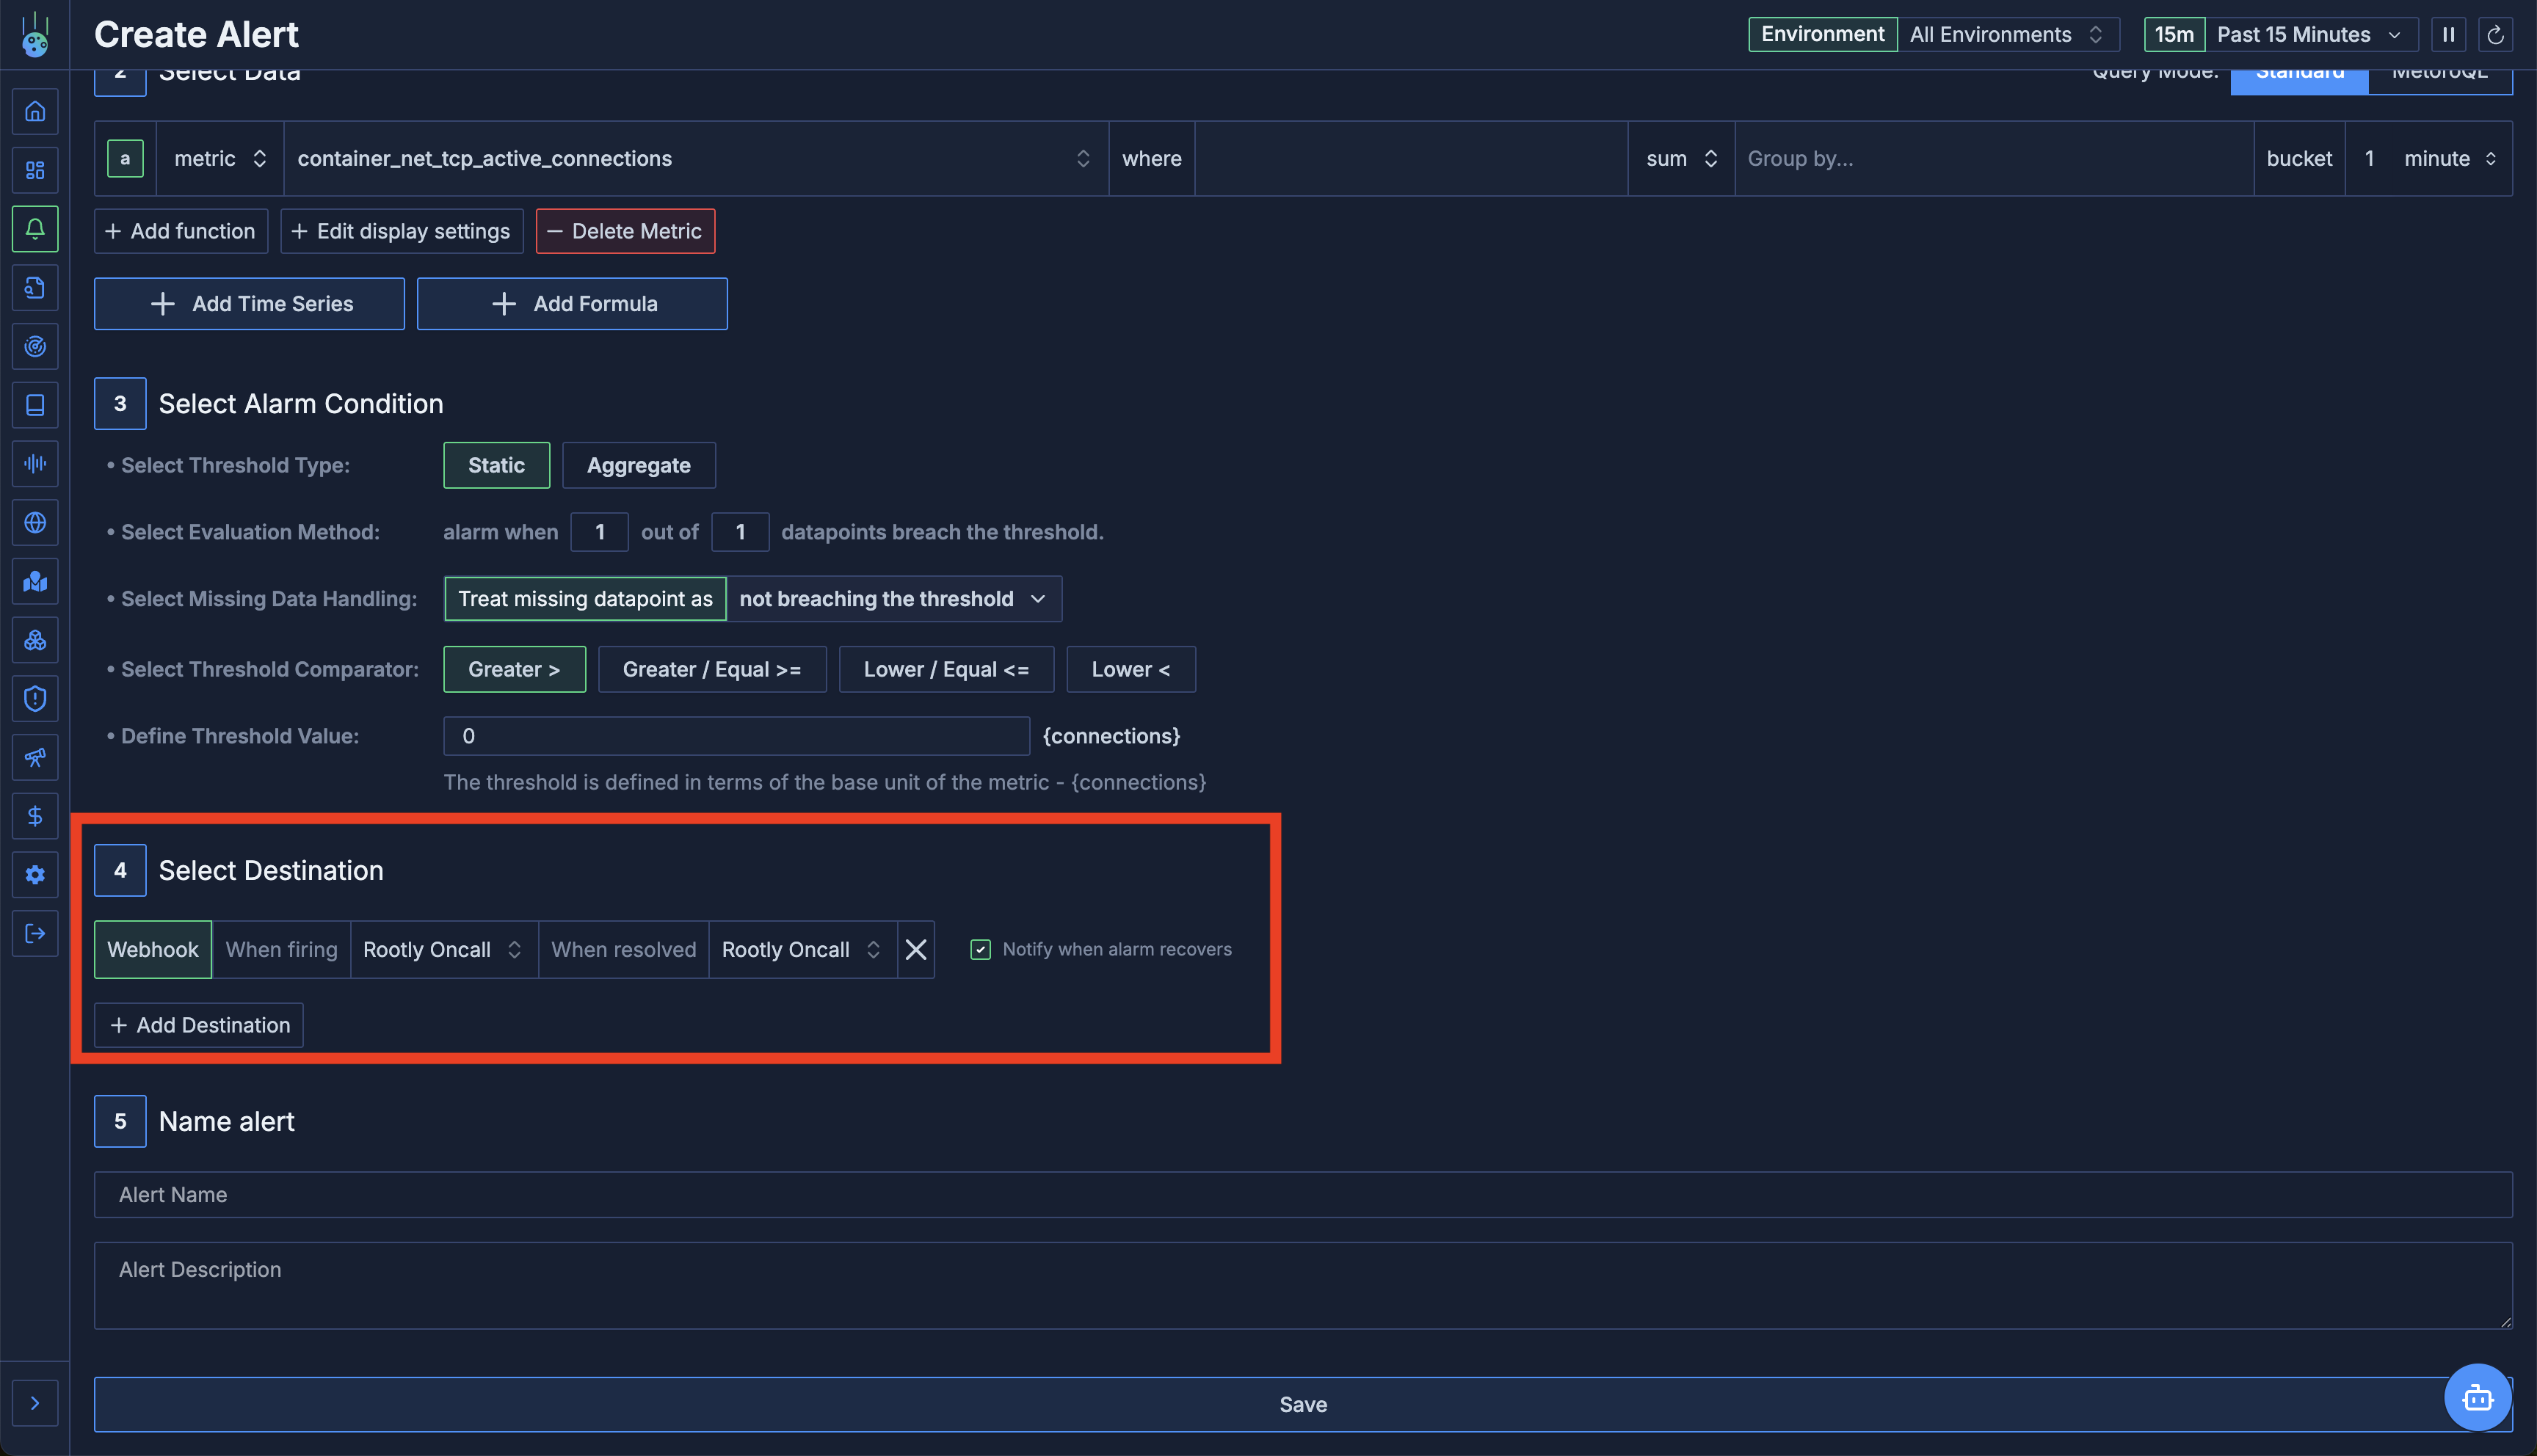 Complete the alert configuration and save
## Configuring Auto-Resolve (Recovery Notifications)
Rootly supports auto-resolving incidents when alerts recover. This feature ensures incidents are automatically closed when the underlying issue is resolved.
### Enable Recovery Notifications
When configuring your alert destination in Metoro:
* Check the **"Notify when alarm recovers"** checkbox next to the webhook destination
* This expands the interface to show two webhook selectors, one for firing and one for recovery.
You have two options:
**Option 1: Same Webhook**
* Use the same Rootly webhook for both firing and resolved states
* Rootly will handle the state change based on the `alert_state` field
**Option 2: Separate Webhook**
* Configure a different Rootly webhook specifically for recovery
* Useful if you have different workflows for incident creation vs resolution
You need to have a field in the body JSON for indicating the state of the alert for the auto-resolve feature to work. Use the `$state` variable in your Webhook body.
### Rootly Auto-Resolve Configuration
In Rootly, configure your webhook to handle the recovery state:
In your Rootly, go to Alerts → Sources and select the webhook you created for Metoro.
* Go to the **Configure** tab and scroll down to the **Auto-Resolve** section.
* Enable the auto-resolve feature by toggling the switch.
Configure Rootly to recognize:
* The `alert_state` field (or the key you used in webhook body that corresponds to `$state` value) with value `"resolved"` triggers incident resolution.
* Use `alert_fire_uuid` or `alert_uuid` to match the specific incident to resolve.
## Important: Handling Grouped Alerts
When using alerts with "group by" configurations, understanding the difference between `$alert_fire_uuid` and `$alert_uuid` is crucial for proper incident management in Rootly.
### Understanding Alert UUIDs
* `$alert_uuid`: The unique identifier for the alert definition. This is the same for all firing instances of the alert you created in Metoro.
* `$alert_fire_uuid`: The unique identifier for a specific firing instance (each group by attribute value) of the alert. This is generated each time the alert fires.
**For alerts WITHOUT group bys:**
Both can be used for matching incidents in Rootly, as an alert without a group by will only have one firing instance since the alert evaluates only one time series against the alert conditions.
**For alerts WITH group bys:**
You **MUST use `$alert_fire_uuid`** for auto-resolve to work correctly.
This is because each group by attribute (e.g., `service.name`, `environment`) will generate a unique firing instance, and using `$alert_uuid` would not correctly match the specific incident to resolve. For example, if `service.name` `MyServiceX` and `MyServiceY` are firing for the same alert, they will have the same `$alert_uuid` but different `$alert_fire_uuid`s.
Using `$alert_fire_uuid` ensures that Rootly resolves the correct incident for the specific service or environment that recovered. If you use `$alert_uuid`, when `MyServiceX` recovers, it would resolve the incident for `MyServiceY` as well, which is not the intended behavior.
## Troubleshooting
* Verify the webhook URL is correct
* Check the Authorization header has the correct Bearer token
* Look for errors in Metoro Logs: filter by `environment=metoro-internal` and `service.name=metoro-webhooks`
* Ensure recovery notifications are enabled in the Metoro alert
* Ensure that the correct webhook body is being sent to Rootly from the **Payload** tab. For example, if you are using JSON as the body format and the body is not a valid JSON, Metoro won't be able to send the webhook with the defined body.
* Verify you're using `$alert_fire_uuid` for matching (especially with grouped alerts)
* Check that Rootly's auto-resolve feature is enabled
* Confirm the `alert_state` field correctly shows "resolved"
* Review your webhook body template in Metoro to ensure it is a valid JSON (if using JSON format)
* Check what Rootly receives in the **Payload** tab of the webhook configuration
* Ensure all required Rootly fields are included
* Check that template variables are properly formatted with `$` prefix
Variables such as `$environment` and `$service` will only get populated if you are using group bys with `environment` or `service.name`/`server.service.name`/`client.service.name`.
* Regenerate the Bearer token in Rootly
* Update the Authorization header in Metoro webhook configuration
* Ensure the Authorization header format is exactly:
* Header Name: `Authorization`
* Value: `Bearer YOUR_TOKEN`
## Monitoring Integration Health
You can monitor the health of your Rootly integration:
1. **Check Webhook Logs in Metoro**
* Go to [Metoro Logs](https://us-east.metoro.io/logs)
* Filter: `environment=metoro-internal` and `service.name=metoro-webhooks`
* Look for successful deliveries and any errors
2. **Verify in Rootly**
* Check the webhook activity log in Rootly
* Confirm incidents are being created and resolved as expected
## Related Documentation
Learn more about configuring alert destinations and recovery notifications
Detailed guide on webhook configuration and template variables
Step-by-step guide to creating alerts in Metoro
Common alert patterns and configurations
***
**Need Help?**
For assistance with the Rootly integration, contact [support@metoro.io](mailto:support@metoro.io) or join our [Slack community](https://join.slack.com/t/metorocommunity/shared_invite/zt-2makpjl5j-F0WcpGnPcdc8anbNGcewqw).
Complete the alert configuration and save
## Configuring Auto-Resolve (Recovery Notifications)
Rootly supports auto-resolving incidents when alerts recover. This feature ensures incidents are automatically closed when the underlying issue is resolved.
### Enable Recovery Notifications
When configuring your alert destination in Metoro:
* Check the **"Notify when alarm recovers"** checkbox next to the webhook destination
* This expands the interface to show two webhook selectors, one for firing and one for recovery.
You have two options:
**Option 1: Same Webhook**
* Use the same Rootly webhook for both firing and resolved states
* Rootly will handle the state change based on the `alert_state` field
**Option 2: Separate Webhook**
* Configure a different Rootly webhook specifically for recovery
* Useful if you have different workflows for incident creation vs resolution
You need to have a field in the body JSON for indicating the state of the alert for the auto-resolve feature to work. Use the `$state` variable in your Webhook body.
### Rootly Auto-Resolve Configuration
In Rootly, configure your webhook to handle the recovery state:
In your Rootly, go to Alerts → Sources and select the webhook you created for Metoro.
* Go to the **Configure** tab and scroll down to the **Auto-Resolve** section.
* Enable the auto-resolve feature by toggling the switch.
Configure Rootly to recognize:
* The `alert_state` field (or the key you used in webhook body that corresponds to `$state` value) with value `"resolved"` triggers incident resolution.
* Use `alert_fire_uuid` or `alert_uuid` to match the specific incident to resolve.
## Important: Handling Grouped Alerts
When using alerts with "group by" configurations, understanding the difference between `$alert_fire_uuid` and `$alert_uuid` is crucial for proper incident management in Rootly.
### Understanding Alert UUIDs
* `$alert_uuid`: The unique identifier for the alert definition. This is the same for all firing instances of the alert you created in Metoro.
* `$alert_fire_uuid`: The unique identifier for a specific firing instance (each group by attribute value) of the alert. This is generated each time the alert fires.
**For alerts WITHOUT group bys:**
Both can be used for matching incidents in Rootly, as an alert without a group by will only have one firing instance since the alert evaluates only one time series against the alert conditions.
**For alerts WITH group bys:**
You **MUST use `$alert_fire_uuid`** for auto-resolve to work correctly.
This is because each group by attribute (e.g., `service.name`, `environment`) will generate a unique firing instance, and using `$alert_uuid` would not correctly match the specific incident to resolve. For example, if `service.name` `MyServiceX` and `MyServiceY` are firing for the same alert, they will have the same `$alert_uuid` but different `$alert_fire_uuid`s.
Using `$alert_fire_uuid` ensures that Rootly resolves the correct incident for the specific service or environment that recovered. If you use `$alert_uuid`, when `MyServiceX` recovers, it would resolve the incident for `MyServiceY` as well, which is not the intended behavior.
## Troubleshooting
* Verify the webhook URL is correct
* Check the Authorization header has the correct Bearer token
* Look for errors in Metoro Logs: filter by `environment=metoro-internal` and `service.name=metoro-webhooks`
* Ensure recovery notifications are enabled in the Metoro alert
* Ensure that the correct webhook body is being sent to Rootly from the **Payload** tab. For example, if you are using JSON as the body format and the body is not a valid JSON, Metoro won't be able to send the webhook with the defined body.
* Verify you're using `$alert_fire_uuid` for matching (especially with grouped alerts)
* Check that Rootly's auto-resolve feature is enabled
* Confirm the `alert_state` field correctly shows "resolved"
* Review your webhook body template in Metoro to ensure it is a valid JSON (if using JSON format)
* Check what Rootly receives in the **Payload** tab of the webhook configuration
* Ensure all required Rootly fields are included
* Check that template variables are properly formatted with `$` prefix
Variables such as `$environment` and `$service` will only get populated if you are using group bys with `environment` or `service.name`/`server.service.name`/`client.service.name`.
* Regenerate the Bearer token in Rootly
* Update the Authorization header in Metoro webhook configuration
* Ensure the Authorization header format is exactly:
* Header Name: `Authorization`
* Value: `Bearer YOUR_TOKEN`
## Monitoring Integration Health
You can monitor the health of your Rootly integration:
1. **Check Webhook Logs in Metoro**
* Go to [Metoro Logs](https://us-east.metoro.io/logs)
* Filter: `environment=metoro-internal` and `service.name=metoro-webhooks`
* Look for successful deliveries and any errors
2. **Verify in Rootly**
* Check the webhook activity log in Rootly
* Confirm incidents are being created and resolved as expected
## Related Documentation
Learn more about configuring alert destinations and recovery notifications
Detailed guide on webhook configuration and template variables
Step-by-step guide to creating alerts in Metoro
Common alert patterns and configurations
***
**Need Help?**
For assistance with the Rootly integration, contact [support@metoro.io](mailto:support@metoro.io) or join our [Slack community](https://join.slack.com/t/metorocommunity/shared_invite/zt-2makpjl5j-F0WcpGnPcdc8anbNGcewqw).